


注意
点击此处下载完整的示例代码
PyTorch 中 non_blocking 和 pin_memory() 的良好使用指南
创建日期:2024 年 7 月 31 日 | 最后更新:2025 年 3 月 18 日 | 最后验证:2024 年 11 月 5 日
引言
在许多 PyTorch 应用中,将数据从 CPU 传输到 GPU 是基础操作。对于用户来说,理解设备之间数据传输最有效的工具和选项至关重要。本教程探讨了 PyTorch 中两种关键的设备间数据传输方法:pin_memory() 和使用 non_blocking=True 选项的 to()。
您将学到什么
通过异步传输和内存固定可以优化张量从 CPU 到 GPU 的传输。然而,有一些重要的注意事项:
使用
tensor.pin_memory().to(device, non_blocking=True)可能比直接使用tensor.to(device)慢一倍。通常,
tensor.to(device, non_blocking=True)是提高传输速度的有效选择。虽然
cpu_tensor.to("cuda", non_blocking=True).mean()可以正确执行,但尝试使用cuda_tensor.to("cpu", non_blocking=True).mean()将导致错误的输出。
前言
本教程中报告的性能取决于用于构建教程的系统。尽管结论适用于不同的系统,但具体观察结果可能会因可用硬件而略有差异,尤其是在较旧的硬件上。本教程的主要目标是提供一个理论框架,以理解 CPU 到 GPU 的数据传输。然而,任何设计决策都应根据具体情况量身定制,并以基准测试的吞吐量测量以及手头任务的具体要求为指导。
import torch

assert torch.cuda.is_available(), "A cuda device is required to run this tutorial"
本教程需要安装 tensordict。如果你的环境中还没有 tensordict,请在单独的单元格中运行以下命令进行安装
# Install tensordict with the following command
!pip3 install tensordict
我们首先概述围绕这些概念的理论,然后转向具体的功能测试示例。
背景知识
内存管理基础知识
当在 PyTorch 中创建一个 CPU 张量时,张量的内容需要被放入内存。这里谈论的内存是一个相当复杂的概念,值得仔细研究。我们区分由内存管理单元处理的两种类型的内存:RAM(为简单起见)和磁盘上的交换空间(可能是硬盘或不是)。硬盘和 RAM(物理内存)中的可用空间共同构成了虚拟内存,它是可用总资源的抽象。简而言之,虚拟内存使得可用空间比孤立的 RAM 更大,并创建了主内存比实际更大的幻觉。
在正常情况下,常规的 CPU 张量是可分页的(pageable),这意味着它被分成称为页(pages)的块,这些块可以存在于虚拟内存的任何地方(无论是 RAM 还是磁盘)。正如前面提到的,这有一个优势,就是内存看起来比实际的主内存更大。
通常,当程序访问一个不在 RAM 中的页时,会发生“页错误”(page fault),然后操作系统 (OS) 会将该页带回 RAM(称为“换入”或“页入”)。反过来,操作系统可能不得不“换出”或“页出”另一页,以便为新页腾出空间。
与可分页内存相反,固定(pinned)内存(也称为页锁定(page-locked)或不可分页(non-pageable)内存)是一种不能被换出到磁盘的内存类型。它允许更快、更可预测的访问时间,但缺点是它比可分页内存(即主内存)更有限。
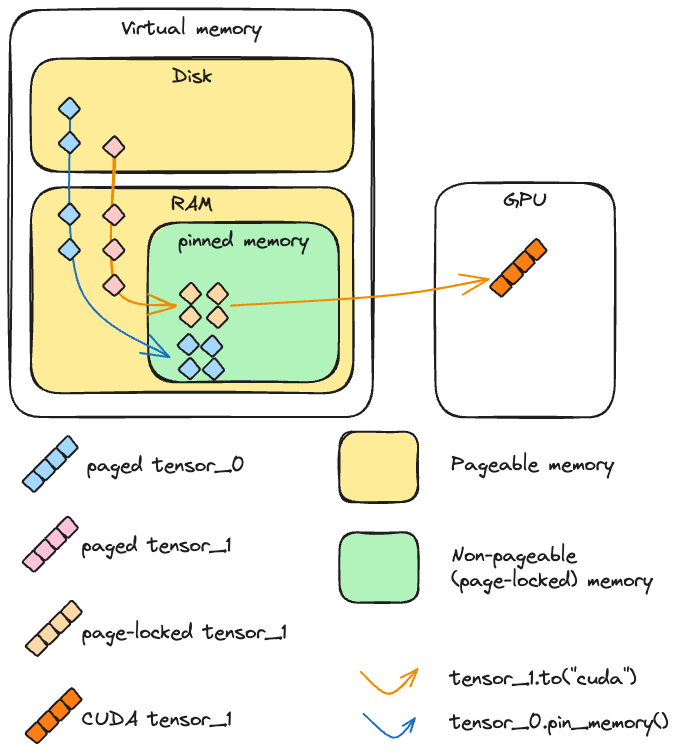
CUDA 与(不可)分页内存
为了理解 CUDA 如何将张量从 CPU 复制到 CUDA,我们考虑以上两种情况:
如果内存是页锁定的,设备可以直接访问主内存中的数据。内存地址是明确定义的,需要读取这些数据的函数可以显著加速。
如果内存是可分页的,所有页必须先被带到主内存,然后才能发送到 GPU。此操作可能需要时间,并且不如在页锁定张量上执行时可预测。
更精确地说,当 CUDA 将可分页数据从 CPU 发送到 GPU 时,它必须首先创建该数据的页锁定副本,然后才能进行传输。
使用 non_blocking=True 的异步 vs. 同步操作 (CUDA cudaMemcpyAsync)
在执行从主机(例如 CPU)到设备(例如 GPU)的复制时,CUDA 工具包提供了相对于主机同步或异步执行这些操作的模式。
实际上,在调用 to() 时,PyTorch 总是会调用 cudaMemcpyAsync。如果 non_blocking=False(默认值),则在每次 cudaMemcpyAsync 调用后都会调用 cudaStreamSynchronize,这使得对 to() 的调用在主线程中是阻塞的。如果 non_blocking=True,则不会触发同步,并且主机上的主线程不会被阻塞。因此,从主机的角度来看,可以同时将多个张量发送到设备,因为线程无需等待一个传输完成即可启动另一个。
注意
通常,传输在设备端是阻塞的(即使在主机端不是):设备上的复制不能在执行另一个操作时发生。然而,在某些高级场景中,复制和内核执行可以在 GPU 端同时进行。如下例所示,必须满足三个要求才能启用此功能:
设备必须至少有一个空闲的 DMA(直接内存访问)引擎。Volterra、Tesla 或 H100 等现代 GPU 架构拥有多个 DMA 引擎。
传输必须在单独的非默认 cuda 流上完成。在 PyTorch 中,可以使用
Stream处理 cuda 流。源数据必须位于固定内存中。
我们通过对以下脚本运行性能分析来演示这一点。
import contextlib

from torch.cuda import Stream


s = Stream()

torch.manual_seed(42)
t1_cpu_pinned = torch.randn(1024**2 * 5, pin_memory=True)
t2_cpu_paged = torch.randn(1024**2 * 5, pin_memory=False)
t3_cuda = torch.randn(1024**2 * 5, device="cuda:0")

assert torch.cuda.is_available()
device = torch.device("cuda", torch.cuda.current_device())


# The function we want to profile
def inner(pinned: bool, streamed: bool):
    with torch.cuda.stream(s) if streamed else contextlib.nullcontext():
        if pinned:
            t1_cuda = t1_cpu_pinned.to(device, non_blocking=True)
        else:
            t2_cuda = t2_cpu_paged.to(device, non_blocking=True)
        t_star_cuda_h2d_event = s.record_event()
    # This operation can be executed during the CPU to GPU copy if and only if the tensor is pinned and the copy is
    #  done in the other stream
    t3_cuda_mul = t3_cuda * t3_cuda * t3_cuda
    t3_cuda_h2d_event = torch.cuda.current_stream().record_event()
    t_star_cuda_h2d_event.synchronize()
    t3_cuda_h2d_event.synchronize()


# Our profiler: profiles the `inner` function and stores the results in a .json file
def benchmark_with_profiler(
    pinned,
    streamed,
) -> None:
    torch._C._profiler._set_cuda_sync_enabled_val(True)
    wait, warmup, active = 1, 1, 2
    num_steps = wait + warmup + active
    rank = 0
    with torch.profiler.profile(
        activities=[
            torch.profiler.ProfilerActivity.CPU,
            torch.profiler.ProfilerActivity.CUDA,
        ],
        schedule=torch.profiler.schedule(
            wait=wait, warmup=warmup, active=active, repeat=1, skip_first=1
        ),
    ) as prof:
        for step_idx in range(1, num_steps + 1):
            inner(streamed=streamed, pinned=pinned)
            if rank is None or rank == 0:
                prof.step()
    prof.export_chrome_trace(f"trace_streamed{int(streamed)}_pinned{int(pinned)}.json")
在 chrome (chrome://tracing) 中加载这些性能分析跟踪,结果如下:首先,让我们看看如果可分页张量在主流中发送到 GPU 后执行 t3_cuda 的算术操作时会发生什么
benchmark_with_profiler(streamed=False, pinned=False)

使用固定张量并不会显著改变跟踪,两个操作仍然是连续执行的
benchmark_with_profiler(streamed=False, pinned=True)

在单独的流上将可分页张量发送到 GPU 也是一个阻塞操作
benchmark_with_profiler(streamed=True, pinned=False)

只有固定张量复制到 GPU 在单独流上进行时,才能与在主流上执行的另一个 cuda kernel 重叠
benchmark_with_profiler(streamed=True, pinned=True)

PyTorch 视角
pin_memory()
PyTorch 提供了通过 pin_memory() 方法和构造函数参数创建张量并发送到页锁定内存的可能性。在 CUDA 初始化了的机器上,CPU 张量可以通过 pin_memory() 方法转换为固定内存。重要的是,pin_memory 在主机的主线程上是阻塞的:它会等待张量复制到页锁定内存后再执行下一个操作。新张量可以使用 zeros()、ones() 等函数和其它构造函数直接在固定内存中创建。
让我们检查一下固定内存并发送张量到 CUDA 的速度
import torch
import gc
from torch.utils.benchmark import Timer
import matplotlib.pyplot as plt


def timer(cmd):
    median = (
        Timer(cmd, globals=globals())
        .adaptive_autorange(min_run_time=1.0, max_run_time=20.0)
        .median
        * 1000
    )
    print(f"{cmd}: {median: 4.4f} ms")
    return median


# A tensor in pageable memory
pageable_tensor = torch.randn(1_000_000)

# A tensor in page-locked (pinned) memory
pinned_tensor = torch.randn(1_000_000, pin_memory=True)

# Runtimes:
pageable_to_device = timer("pageable_tensor.to('cuda:0')")
pinned_to_device = timer("pinned_tensor.to('cuda:0')")
pin_mem = timer("pageable_tensor.pin_memory()")
pin_mem_to_device = timer("pageable_tensor.pin_memory().to('cuda:0')")

# Ratios:
r1 = pinned_to_device / pageable_to_device
r2 = pin_mem_to_device / pageable_to_device

# Create a figure with the results
fig, ax = plt.subplots()

xlabels = [0, 1, 2]
bar_labels = [
    "pageable_tensor.to(device) (1x)",
    f"pinned_tensor.to(device) ({r1:4.2f}x)",
    f"pageable_tensor.pin_memory().to(device) ({r2:4.2f}x)"
    f"\npin_memory()={100*pin_mem/pin_mem_to_device:.2f}% of runtime.",
]
values = [pageable_to_device, pinned_to_device, pin_mem_to_device]
colors = ["tab:blue", "tab:red", "tab:orange"]
ax.bar(xlabels, values, label=bar_labels, color=colors)

ax.set_ylabel("Runtime (ms)")
ax.set_title("Device casting runtime (pin-memory)")
ax.set_xticks([])
ax.legend()

plt.show()

# Clear tensors
del pageable_tensor, pinned_tensor
_ = gc.collect()
我们可以观察到,将固定内存张量转换为 GPU 确实比可分页张量快得多,因为在底层,可分页张量在发送到 GPU 之前必须先复制到固定内存中。
然而,与一些普遍的看法相反,在将可分页张量转换为 GPU 之前调用 pin_memory() 不会带来任何显著的速度提升,相反,这个调用通常比直接执行传输更慢。这是有道理的,因为我们实际上是在要求 Python 执行一个 CUDA 在从主机复制数据到设备之前无论如何都会执行的操作。
注意
pin_memory 的 PyTorch 实现依赖于通过 cudaHostAlloc 在固定内存中创建一个全新的存储,在极少数情况下,它可能比 cudaMemcpy 分块传输数据更快。同样,观察结果可能因可用硬件、要发送的张量大小或可用 RAM 量而异。
non_blocking=True
如前所述,许多 PyTorch 操作可以通过 non_blocking 参数选择相对于主机异步执行。
在这里,为了准确地说明使用 non_blocking 的好处,我们将设计一个稍微复杂的实验,因为我们想评估在调用和不调用 non_blocking 的情况下,将多个张量发送到 GPU 的速度有多快。
# A simple loop that copies all tensors to cuda
def copy_to_device(*tensors):
    result = []
    for tensor in tensors:
        result.append(tensor.to("cuda:0"))
    return result


# A loop that copies all tensors to cuda asynchronously
def copy_to_device_nonblocking(*tensors):
    result = []
    for tensor in tensors:
        result.append(tensor.to("cuda:0", non_blocking=True))
    # We need to synchronize
    torch.cuda.synchronize()
    return result


# Create a list of tensors
tensors = [torch.randn(1000) for _ in range(1000)]
to_device = timer("copy_to_device(*tensors)")
to_device_nonblocking = timer("copy_to_device_nonblocking(*tensors)")

# Ratio
r1 = to_device_nonblocking / to_device

# Plot the results
fig, ax = plt.subplots()

xlabels = [0, 1]
bar_labels = [f"to(device) (1x)", f"to(device, non_blocking=True) ({r1:4.2f}x)"]
colors = ["tab:blue", "tab:red"]
values = [to_device, to_device_nonblocking]

ax.bar(xlabels, values, label=bar_labels, color=colors)

ax.set_ylabel("Runtime (ms)")
ax.set_title("Device casting runtime (non-blocking)")
ax.set_xticks([])
ax.legend()

plt.show()
为了更好地了解这里发生的事情,让我们对这两个函数进行性能分析
首先,让我们看看使用常规 to(device) 时的调用栈
print("Call to `to(device)`", profile_mem("copy_to_device(*tensors)"))
现在是 non_blocking 版本
print(
    "Call to `to(device, non_blocking=True)`",
    profile_mem("copy_to_device_nonblocking(*tensors)"),
)
毫无疑问,使用 non_blocking=True 时结果更好,因为所有传输都在主机端同时启动,并且只进行一次同步。
收益将取决于张量的数量和大小以及所使用的硬件。
注意
有趣的是,阻塞的 to("cuda") 实际上执行了与 non_blocking=True 版本相同的异步设备转换操作 (cudaMemcpyAsync),只是在每次复制后都有一个同步点。
协同效应
既然我们已经指出,将已在固定内存中的张量传输到 GPU 比从可分页内存传输更快,并且我们知道异步执行这些传输也比同步执行更快,那么我们可以对这些方法的组合进行基准测试。首先,让我们编写几个新函数,它们将对每个张量调用 pin_memory 和 to(device)
def pin_copy_to_device(*tensors):
    result = []
    for tensor in tensors:
        result.append(tensor.pin_memory().to("cuda:0"))
    return result


def pin_copy_to_device_nonblocking(*tensors):
    result = []
    for tensor in tensors:
        result.append(tensor.pin_memory().to("cuda:0", non_blocking=True))
    # We need to synchronize
    torch.cuda.synchronize()
    return result
对于较大的张量批次,使用 pin_memory() 的好处更加明显
tensors = [torch.randn(1_000_000) for _ in range(1000)]
page_copy = timer("copy_to_device(*tensors)")
page_copy_nb = timer("copy_to_device_nonblocking(*tensors)")

tensors_pinned = [torch.randn(1_000_000, pin_memory=True) for _ in range(1000)]
pinned_copy = timer("copy_to_device(*tensors_pinned)")
pinned_copy_nb = timer("copy_to_device_nonblocking(*tensors_pinned)")

pin_and_copy = timer("pin_copy_to_device(*tensors)")
pin_and_copy_nb = timer("pin_copy_to_device_nonblocking(*tensors)")

# Plot
strategies = ("pageable copy", "pinned copy", "pin and copy")
blocking = {
    "blocking": [page_copy, pinned_copy, pin_and_copy],
    "non-blocking": [page_copy_nb, pinned_copy_nb, pin_and_copy_nb],
}

x = torch.arange(3)
width = 0.25
multiplier = 0


fig, ax = plt.subplots(layout="constrained")

for attribute, runtimes in blocking.items():
    offset = width * multiplier
    rects = ax.bar(x + offset, runtimes, width, label=attribute)
    ax.bar_label(rects, padding=3, fmt="%.2f")
    multiplier += 1

# Add some text for labels, title and custom x-axis tick labels, etc.
ax.set_ylabel("Runtime (ms)")
ax.set_title("Runtime (pin-mem and non-blocking)")
ax.set_xticks([0, 1, 2])
ax.set_xticklabels(strategies)
plt.setp(ax.get_xticklabels(), rotation=45, ha="right", rotation_mode="anchor")
ax.legend(loc="upper left", ncols=3)

plt.show()

del tensors, tensors_pinned
_ = gc.collect()
其他复制方向 (GPU -> CPU, CPU -> MPS)
到目前为止,我们一直假设从 CPU 到 GPU 的异步复制是安全的。这通常是正确的,因为 CUDA 会自动处理同步,以确保在读取时访问的数据是有效的,特别是在张量位于可分页内存中时。
然而,在其他情况下,我们不能做出同样的假设:当张量被放置在固定内存中时,在调用主机到设备传输后修改原始副本可能会损坏 GPU 上接收到的数据。类似地,当传输方向相反,从 GPU 到 CPU,或从任何非 CPU 或 GPU 的设备到任何非 CUDA 处理的 GPU 设备(例如 MPS)时,如果没有显式同步,则无法保证在 GPU 上读取的数据是有效的。
在这些场景中,这些传输不能保证在数据访问时复制已完成。因此,主机上的数据可能不完整或不正确,实际上变成了无效数据(garbage)。
我们首先用一个固定内存张量来演示这一点
DELAY = 100000000
try:
    i = -1
    for i in range(100):
        # Create a tensor in pin-memory
        cpu_tensor = torch.ones(1024, 1024, pin_memory=True)
        torch.cuda.synchronize()
        # Send the tensor to CUDA
        cuda_tensor = cpu_tensor.to("cuda", non_blocking=True)
        torch.cuda._sleep(DELAY)
        # Corrupt the original tensor
        cpu_tensor.zero_()
        assert (cuda_tensor == 1).all()
    print("No test failed with non_blocking and pinned tensor")
except AssertionError:
    print(f"{i}th test failed with non_blocking and pinned tensor. Skipping remaining tests")
使用可分页张量总是有效的
i = -1
for i in range(100):
    # Create a tensor in pageable memory
    cpu_tensor = torch.ones(1024, 1024)
    torch.cuda.synchronize()
    # Send the tensor to CUDA
    cuda_tensor = cpu_tensor.to("cuda", non_blocking=True)
    torch.cuda._sleep(DELAY)
    # Corrupt the original tensor
    cpu_tensor.zero_()
    assert (cuda_tensor == 1).all()
print("No test failed with non_blocking and pageable tensor")
现在让我们演示一下,CUDA 到 CPU 的传输如果没有同步,也无法产生可靠的输出
tensor = (
    torch.arange(1, 1_000_000, dtype=torch.double, device="cuda")
    .expand(100, 999999)
    .clone()
)
torch.testing.assert_close(
    tensor.mean(), torch.tensor(500_000, dtype=torch.double, device="cuda")
), tensor.mean()
try:
    i = -1
    for i in range(100):
        cpu_tensor = tensor.to("cpu", non_blocking=True)
        torch.testing.assert_close(
            cpu_tensor.mean(), torch.tensor(500_000, dtype=torch.double)
        )
    print("No test failed with non_blocking")
except AssertionError:
    print(f"{i}th test failed with non_blocking. Skipping remaining tests")
try:
    i = -1
    for i in range(100):
        cpu_tensor = tensor.to("cpu", non_blocking=True)
        torch.cuda.synchronize()
        torch.testing.assert_close(
            cpu_tensor.mean(), torch.tensor(500_000, dtype=torch.double)
        )
    print("No test failed with synchronize")
except AssertionError:
    print(f"One test failed with synchronize: {i}th assertion!")
通常,只有当目标是支持 CUDA 的设备且原始张量位于可分页内存中时,异步复制到设备才可以在没有显式同步的情况下是安全的。
总而言之,使用 non_blocking=True 从 CPU 复制数据到 GPU 是安全的,但对于任何其他方向,仍然可以使用 non_blocking=True,但用户必须确保在访问数据之前执行设备同步。
实用建议
现在我们可以根据我们的观察总结一些初步建议
总的来说,无论原始张量是否在固定内存中,non_blocking=True 都能提供良好的吞吐量。如果张量已经在固定内存中,传输可以加速,但从 Python 主线程手动将其发送到固定内存是一个主机上的阻塞操作,因此会抵消使用 non_blocking=True 的大部分好处(因为 CUDA 无论如何都会执行 pin_memory 传输)。
现在你可能会合理地问,pin_memory() 方法有什么用。在下一节中,我们将进一步探讨如何使用它来进一步加速数据传输。
额外考量
众所周知,PyTorch 提供了一个 DataLoader 类,其构造函数接受 pin_memory 参数。考虑到我们之前关于 pin_memory 的讨论,你可能想知道如果内存固定本身是阻塞的,DataLoader 是如何加速数据传输的。
关键在于 DataLoader 使用了一个单独的线程来处理从可分页内存到固定内存的数据传输,从而防止了主线程的任何阻塞。
为了说明这一点,我们将使用来自同名库的 TensorDict 原语。调用 to() 时,默认行为是异步将张量发送到设备,然后进行一次 torch.device.synchronize() 调用。
此外,TensorDict.to() 包含一个 non_blocking_pin 选项,该选项会启动多个线程在继续执行 to(device) 之前执行 pin_memory()。这种方法可以进一步加速数据传输,如下例所示。
from tensordict import TensorDict
import torch
from torch.utils.benchmark import Timer
import matplotlib.pyplot as plt

# Create the dataset
td = TensorDict({str(i): torch.randn(1_000_000) for i in range(1000)})

# Runtimes
copy_blocking = timer("td.to('cuda:0', non_blocking=False)")
copy_non_blocking = timer("td.to('cuda:0')")
copy_pin_nb = timer("td.to('cuda:0', non_blocking_pin=True, num_threads=0)")
copy_pin_multithread_nb = timer("td.to('cuda:0', non_blocking_pin=True, num_threads=4)")

# Rations
r1 = copy_non_blocking / copy_blocking
r2 = copy_pin_nb / copy_blocking
r3 = copy_pin_multithread_nb / copy_blocking

# Figure
fig, ax = plt.subplots()

xlabels = [0, 1, 2, 3]
bar_labels = [
    "Blocking copy (1x)",
    f"Non-blocking copy ({r1:4.2f}x)",
    f"Blocking pin, non-blocking copy ({r2:4.2f}x)",
    f"Non-blocking pin, non-blocking copy ({r3:4.2f}x)",
]
values = [copy_blocking, copy_non_blocking, copy_pin_nb, copy_pin_multithread_nb]
colors = ["tab:blue", "tab:red", "tab:orange", "tab:green"]

ax.bar(xlabels, values, label=bar_labels, color=colors)

ax.set_ylabel("Runtime (ms)")
ax.set_title("Device casting runtime")
ax.set_xticks([])
ax.legend()

plt.show()
在此示例中,我们正在将许多大型张量从 CPU 传输到 GPU。这种情况非常适合利用多线程的 pin_memory(),这可以显著提高性能。然而,如果张量很小,与多线程相关的开销可能超过其带来的好处。同样,如果张量数量很少,在单独线程上固定张量的优势也变得有限。
另外需要注意的是,虽然在固定内存中创建永久缓冲区用于在将张量传输到 GPU 之前从可分页内存中转移张量可能看起来很有优势,但这种策略不一定会加速计算。将数据复制到固定内存引起的固有瓶颈仍然是一个限制因素。
此外,将驻留在磁盘上(无论是在共享内存还是文件中)的数据传输到 GPU 通常需要一个中间步骤,即将数据复制到固定内存(位于 RAM 中)。在这种情况下,对大型数据传输利用 non_blocking 可能会显著增加 RAM 消耗,从而可能导致不利影响。
实际上,没有一刀切的解决方案。使用多线程 pin_memory 并结合 non_blocking 传输的有效性取决于多种因素,包括具体的系统、操作系统、硬件以及正在执行的任务的性质。以下是在尝试加速 CPU 和 GPU 之间的数据传输或比较不同场景下的吞吐量时需要检查的因素列表:
可用核心数量
有多少 CPU 核心可用?系统是否与其他可能争夺资源的用户或进程共享?
核心利用率
CPU 核心是否被其他进程大量占用?应用程序是否在数据传输的同时并发执行其他 CPU 密集型任务?
内存利用率
当前使用了多少可分页内存和页锁定内存?是否有足够的可用内存来分配额外的固定内存而不影响系统性能?记住天下没有免费的午餐,例如
pin_memory会消耗 RAM 并可能影响其他任务。CUDA 设备能力
GPU 是否支持多个 DMA 引擎进行并发数据传输?正在使用的 CUDA 设备有哪些具体能力和限制?
待发送张量数量
典型操作中传输了多少张量?
待发送张量大小
正在传输的张量的大小是多少?少量大张量或大量小张量可能无法从同一传输程序中获益。
系统架构
系统架构如何影响数据传输速度(例如,总线速度、网络延迟)?
此外,在锁定内存中分配大量张量或大尺寸张量可能会占用相当一部分 RAM。这减少了用于其他关键操作(例如分页)的可用内存,从而对算法的整体性能产生负面影响。
结论
在本教程中,我们探讨了将张量从主机发送到设备时影响传输速度和内存管理的几个关键因素。我们了解到,使用 non_blocking=True 通常会加速数据传输,并且 pin_memory() 如果正确实现,也可以提升性能。然而,这些技术需要精心设计和校准才能有效。
请记住,对代码进行性能分析并密切关注内存消耗对于优化资源使用和实现最佳性能至关重要。
