


注意
点击这里下载完整的示例代码
编写自定义数据集(Dataset)、数据加载器(DataLoader)和转换(Transform)
创建于: 2017年6月10日 | 最后更新于: 2025年3月11日 | 最后验证于: 2024年11月5日
解决任何机器学习问题都需要花费大量精力来准备数据。PyTorch 提供了许多工具来简化数据加载,并希望能使你的代码更具可读性。在本教程中,我们将学习如何从一个非平凡的数据集加载和预处理/增强数据。
要运行本教程,请确保已安装以下软件包
scikit-image: 用于图像 I/O 和转换pandas: 用于更轻松地解析 CSV
import os
import torch
import pandas as pd
from skimage import io, transform
import numpy as np
import matplotlib.pyplot as plt
from torch.utils.data import Dataset, DataLoader
from torchvision import transforms, utils

# Ignore warnings
import warnings
warnings.filterwarnings("ignore")

plt.ion()   # interactive mode
<contextlib.ExitStack object at 0x7f5673c7ebf0>
我们要处理的数据集是关于人脸姿态的。这意味着人脸的标注是这样的
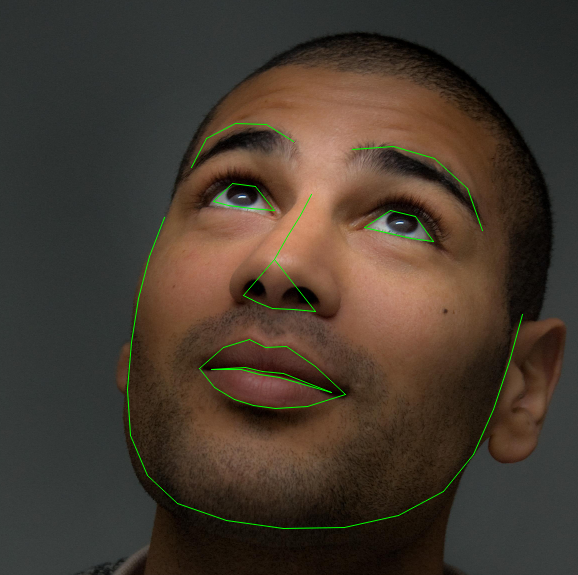
总共为每张人脸标注了 68 个不同的特征点。
数据集附带一个包含标注的 .csv 文件,其内容如下所示
image_name,part_0_x,part_0_y,part_1_x,part_1_y,part_2_x, ... ,part_67_x,part_67_y
0805personali01.jpg,27,83,27,98, ... 84,134
1084239450_e76e00b7e7.jpg,70,236,71,257, ... ,128,312
我们以 CSV 中的一个图像名称及其标注为例,例如行索引 65 的 person-7.jpg。读取它,将图像名称存储在 img_name 中,并将其标注存储在一个 (L, 2) 的数组 landmarks 中,其中 L 是该行中的特征点数量。
landmarks_frame = pd.read_csv('data/faces/face_landmarks.csv')

n = 65
img_name = landmarks_frame.iloc[n, 0]
landmarks = landmarks_frame.iloc[n, 1:]
landmarks = np.asarray(landmarks, dtype=float).reshape(-1, 2)

print('Image name: {}'.format(img_name))
print('Landmarks shape: {}'.format(landmarks.shape))
print('First 4 Landmarks: {}'.format(landmarks[:4]))
Image name: person-7.jpg
Landmarks shape: (68, 2)
First 4 Landmarks: [[32. 65.]
 [33. 76.]
 [34. 86.]
 [34. 97.]]
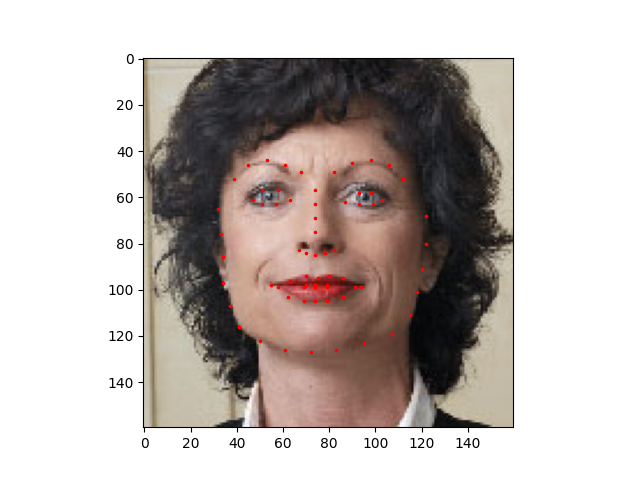
我们来编写一个简单的辅助函数,用于显示图像及其特征点,并用它来展示一个样本。
def show_landmarks(image, landmarks):
    """Show image with landmarks"""
    plt.imshow(image)
    plt.scatter(landmarks[:, 0], landmarks[:, 1], s=10, marker='.', c='r')
    plt.pause(0.001)  # pause a bit so that plots are updated

plt.figure()
show_landmarks(io.imread(os.path.join('data/faces/', img_name)),
               landmarks)
plt.show()
Dataset 类
torch.utils.data.Dataset 是表示数据集的抽象类。你的自定义数据集应该继承 Dataset 并覆盖以下方法
__len__方法,使得len(dataset)返回数据集的大小。__getitem__方法,以支持索引,使得可以使用dataset[i]获取第 \(i\) 个样本。
让我们为我们的人脸特征点数据集创建一个 dataset 类。我们将在 __init__ 中读取 csv 文件,但将图像的读取留在 __getitem__ 中。这样做可以节省内存,因为所有图像不会同时存储在内存中,而是按需读取。
我们数据集的样本将是一个字典 {'image': image, 'landmarks': landmarks}。我们的数据集将接受一个可选参数 transform,以便可以对样本应用任何所需的处理。我们将在下一节中看到 transform 的有用性。
class FaceLandmarksDataset(Dataset):
    """Face Landmarks dataset."""

    def __init__(self, csv_file, root_dir, transform=None):
        """
        Arguments:
            csv_file (string): Path to the csv file with annotations.
            root_dir (string): Directory with all the images.
            transform (callable, optional): Optional transform to be applied
                on a sample.
        """
        self.landmarks_frame = pd.read_csv(csv_file)
        self.root_dir = root_dir
        self.transform = transform

    def __len__(self):
        return len(self.landmarks_frame)

    def __getitem__(self, idx):
        if torch.is_tensor(idx):
            idx = idx.tolist()

        img_name = os.path.join(self.root_dir,
                                self.landmarks_frame.iloc[idx, 0])
        image = io.imread(img_name)
        landmarks = self.landmarks_frame.iloc[idx, 1:]
        landmarks = np.array([landmarks], dtype=float).reshape(-1, 2)
        sample = {'image': image, 'landmarks': landmarks}

        if self.transform:
            sample = self.transform(sample)

        return sample
让我们实例化这个类并迭代数据样本。我们将打印前 4 个样本的大小并显示它们的特征点。
face_dataset = FaceLandmarksDataset(csv_file='data/faces/face_landmarks.csv',
                                    root_dir='data/faces/')

fig = plt.figure()

for i, sample in enumerate(face_dataset):
    print(i, sample['image'].shape, sample['landmarks'].shape)

    ax = plt.subplot(1, 4, i + 1)
    plt.tight_layout()
    ax.set_title('Sample #{}'.format(i))
    ax.axis('off')
    show_landmarks(**sample)

    if i == 3:
        plt.show()
        break
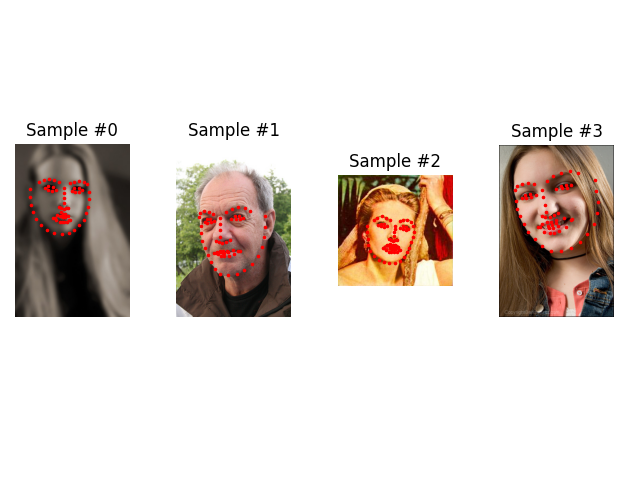
0 (324, 215, 3) (68, 2)
1 (500, 333, 3) (68, 2)
2 (250, 258, 3) (68, 2)
3 (434, 290, 3) (68, 2)
转换(Transforms)
从上面我们可以看到一个问题,即样本大小不一致。大多数神经网络期望固定大小的图像。因此,我们需要编写一些预处理代码。让我们创建三个转换
Rescale: 缩放图像RandomCrop: 从图像中随机裁剪。这是数据增强。ToTensor: 将 numpy 图像转换为 torch 图像(我们需要交换轴)。
我们将它们写成可调用类而不是简单的函数,这样就无需每次调用时都传递转换的参数。为此,我们只需实现 __call__ 方法,如果需要,再实现 __init__ 方法。然后我们可以像这样使用一个转换
tsfm = Transform(params)
transformed_sample = tsfm(sample)
请注意下面这些转换必须同时应用于图像和特征点。
class Rescale(object):
    """Rescale the image in a sample to a given size.

    Args:
        output_size (tuple or int): Desired output size. If tuple, output is
            matched to output_size. If int, smaller of image edges is matched
            to output_size keeping aspect ratio the same.
    """

    def __init__(self, output_size):
        assert isinstance(output_size, (int, tuple))
        self.output_size = output_size

    def __call__(self, sample):
        image, landmarks = sample['image'], sample['landmarks']

        h, w = image.shape[:2]
        if isinstance(self.output_size, int):
            if h > w:
                new_h, new_w = self.output_size * h / w, self.output_size
            else:
                new_h, new_w = self.output_size, self.output_size * w / h
        else:
            new_h, new_w = self.output_size

        new_h, new_w = int(new_h), int(new_w)

        img = transform.resize(image, (new_h, new_w))

        # h and w are swapped for landmarks because for images,
        # x and y axes are axis 1 and 0 respectively
        landmarks = landmarks * [new_w / w, new_h / h]

        return {'image': img, 'landmarks': landmarks}


class RandomCrop(object):
    """Crop randomly the image in a sample.

    Args:
        output_size (tuple or int): Desired output size. If int, square crop
            is made.
    """

    def __init__(self, output_size):
        assert isinstance(output_size, (int, tuple))
        if isinstance(output_size, int):
            self.output_size = (output_size, output_size)
        else:
            assert len(output_size) == 2
            self.output_size = output_size

    def __call__(self, sample):
        image, landmarks = sample['image'], sample['landmarks']

        h, w = image.shape[:2]
        new_h, new_w = self.output_size

        top = np.random.randint(0, h - new_h + 1)
        left = np.random.randint(0, w - new_w + 1)

        image = image[top: top + new_h,
                      left: left + new_w]

        landmarks = landmarks - [left, top]

        return {'image': image, 'landmarks': landmarks}


class ToTensor(object):
    """Convert ndarrays in sample to Tensors."""

    def __call__(self, sample):
        image, landmarks = sample['image'], sample['landmarks']

        # swap color axis because
        # numpy image: H x W x C
        # torch image: C x H x W
        image = image.transpose((2, 0, 1))
        return {'image': torch.from_numpy(image),
                'landmarks': torch.from_numpy(landmarks)}
注意
在上面的例子中,RandomCrop 使用外部库的随机数生成器(在本例中是 Numpy 的 np.random.int)。这可能会导致 DataLoader 出现意外行为(参见此处)。实际上,更安全的方法是坚持使用 PyTorch 的随机数生成器,例如使用 torch.randint。
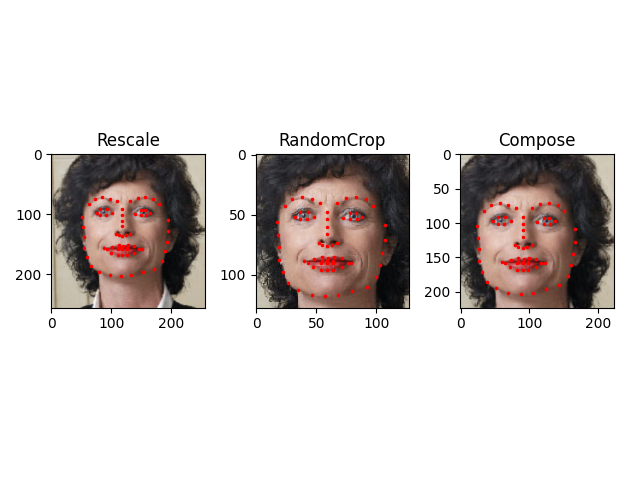
组合转换(Compose transforms)
现在,我们将转换应用于一个样本。
假设我们想将图像的较短边缩放到 256,然后从中随机裁剪一个大小为 224 的正方形。换句话说,我们想组合 Rescale 和 RandomCrop 转换。torchvision.transforms.Compose 是一个简单的可调用类,它允许我们这样做。
scale = Rescale(256)
crop = RandomCrop(128)
composed = transforms.Compose([Rescale(256),
                               RandomCrop(224)])

# Apply each of the above transforms on sample.
fig = plt.figure()
sample = face_dataset[65]
for i, tsfrm in enumerate([scale, crop, composed]):
    transformed_sample = tsfrm(sample)

    ax = plt.subplot(1, 3, i + 1)
    plt.tight_layout()
    ax.set_title(type(tsfrm).__name__)
    show_landmarks(**transformed_sample)

plt.show()
迭代数据集
让我们将这一切放在一起,创建一个带有组合转换的数据集。总结一下,每次从这个数据集中采样时
图像会从文件按需读取
转换会应用于读取的图像
由于其中一个转换是随机的,数据在采样时得到增强
我们可以像之前一样使用 for i in range 循环遍历创建的数据集。
transformed_dataset = FaceLandmarksDataset(csv_file='data/faces/face_landmarks.csv',
                                           root_dir='data/faces/',
                                           transform=transforms.Compose([
                                               Rescale(256),
                                               RandomCrop(224),
                                               ToTensor()
                                           ]))

for i, sample in enumerate(transformed_dataset):
    print(i, sample['image'].size(), sample['landmarks'].size())

    if i == 3:
        break
0 torch.Size([3, 224, 224]) torch.Size([68, 2])
1 torch.Size([3, 224, 224]) torch.Size([68, 2])
2 torch.Size([3, 224, 224]) torch.Size([68, 2])
3 torch.Size([3, 224, 224]) torch.Size([68, 2])
然而,通过使用简单的 for 循环来迭代数据,我们丢失了许多功能。特别是,我们错过了以下几点
批量处理数据
打乱数据
使用
multiprocessing工作进程并行加载数据。
torch.utils.data.DataLoader 是一个迭代器,它提供了所有这些功能。下面使用的参数应该很清楚。一个值得关注的参数是 collate_fn。你可以使用 collate_fn 指定样本如何精确地进行批量处理。但是,默认的 collate 对于大多数用例来说应该可以正常工作。
dataloader = DataLoader(transformed_dataset, batch_size=4,
                        shuffle=True, num_workers=0)


# Helper function to show a batch
def show_landmarks_batch(sample_batched):
    """Show image with landmarks for a batch of samples."""
    images_batch, landmarks_batch = \
            sample_batched['image'], sample_batched['landmarks']
    batch_size = len(images_batch)
    im_size = images_batch.size(2)
    grid_border_size = 2

    grid = utils.make_grid(images_batch)
    plt.imshow(grid.numpy().transpose((1, 2, 0)))

    for i in range(batch_size):
        plt.scatter(landmarks_batch[i, :, 0].numpy() + i * im_size + (i + 1) * grid_border_size,
                    landmarks_batch[i, :, 1].numpy() + grid_border_size,
                    s=10, marker='.', c='r')

        plt.title('Batch from dataloader')

# if you are using Windows, uncomment the next line and indent the for loop.
# you might need to go back and change ``num_workers`` to 0.

# if __name__ == '__main__':
for i_batch, sample_batched in enumerate(dataloader):
    print(i_batch, sample_batched['image'].size(),
          sample_batched['landmarks'].size())

    # observe 4th batch and stop.
    if i_batch == 3:
        plt.figure()
        show_landmarks_batch(sample_batched)
        plt.axis('off')
        plt.ioff()
        plt.show()
        break

0 torch.Size([4, 3, 224, 224]) torch.Size([4, 68, 2])
1 torch.Size([4, 3, 224, 224]) torch.Size([4, 68, 2])
2 torch.Size([4, 3, 224, 224]) torch.Size([4, 68, 2])
3 torch.Size([4, 3, 224, 224]) torch.Size([4, 68, 2])
后话:torchvision
在本教程中,我们学习了如何编写和使用数据集(datasets)、转换(transforms)和数据加载器(dataloader)。torchvision 包提供了一些常见的数据集和转换。你甚至可能不必编写自定义类。torchvision 中提供的一个更通用的数据集是 ImageFolder。它假设图像按以下方式组织
root/ants/xxx.png
root/ants/xxy.jpeg
root/ants/xxz.png
.
.
.
root/bees/123.jpg
root/bees/nsdf3.png
root/bees/asd932_.png
其中“ants”、“bees”等是类别标签。类似地,操作 PIL.Image 的通用转换,如 RandomHorizontalFlip、Scale 等也可用。你可以使用这些来编写一个数据加载器,如下所示
import torch
from torchvision import transforms, datasets

data_transform = transforms.Compose([
        transforms.RandomResizedCrop(224),
        transforms.RandomHorizontalFlip(),
        transforms.ToTensor(),
        transforms.Normalize(mean=[0.485, 0.456, 0.406],
                             std=[0.229, 0.224, 0.225])
    ])
hymenoptera_dataset = datasets.ImageFolder(root='hymenoptera_data/train',
                                           transform=data_transform)
dataset_loader = torch.utils.data.DataLoader(hymenoptera_dataset,
                                             batch_size=4, shuffle=True,
                                             num_workers=4)
对于包含训练代码的示例,请参阅计算机视觉的迁移学习教程。
脚本总运行时间: ( 0 分钟 1.910 秒)
