⚠️ 注意:有限维护
本项目不再积极维护。现有版本仍然可用,但没有计划中的更新、错误修复、新功能或安全补丁。用户应注意漏洞可能无法得到解决。
使用 Torchserve 提供大型模型服务
本文档解释了 Torchserve 如何支持大型模型服务,此处的大型模型指那些无法完全放入单个 GPU 中,因此需要在多个 GPU 上分割成多个分区运行的模型。本页分为以下几个部分:
工作原理?
对于较小模型的 GPU 推理,TorchServe 为每个工作进程执行一个独立的进程,并分配一个 GPU。对于大型模型推理,模型需要分割到多个 GPU 上。有不同的模式可以实现这种分割,通常包括流水线并行 (PP)、张量并行或它们的组合。选择哪种模式以及如何实现分割取决于所用框架的具体实现。TorchServe 允许用户使用任何框架进行模型部署,并通过灵活的配置来适应各种框架的需求。一些框架要求为每个 GPU 执行单独的进程(如 PiPPy, Deep Speed),而另一些则要求单个进程分配所有 GPU(如 vLLM)。如果需要多个进程,TorchServe 会利用 torchrun 为工作进程设置分布式环境。在设置过程中,torchrun 会为分配给工作进程的每个 GPU 启动一个新的进程。是否使用 torchrun 取决于参数 parallelType,该参数可以在 model-config.yaml 中设置为以下选项之一:
pp- 用于流水线并行tp- 用于张量并行pptp- 用于流水线 + 张量并行custom
前三个选项使用 torchrun 设置环境,而“custom”选项则将并行化方式留给用户,并将分配给工作进程的 GPU 分配给单个进程。分配的 GPU 数量由 torchrun 启动的进程数(即通过 nproc-per-node 配置)或参数 parallelLevel 确定。这意味着如果设置了 nproc-per-node,则不应设置参数 parallelLevel,反之亦然。
默认情况下,TorchServe 使用轮询算法将 GPU 分配给主机上的工作进程。对于大型模型推理,分配给每个工作进程的 GPU 数量会根据 model_config.yaml 中指定的 GPU 数量自动计算。CUDA_VISIBLE_DEVICES 根据此数量设置。
例如,假设一个节点上有八个 GPU,一个工作进程需要 4 个 GPU(即 nproc-per-node=4 或 parallelLevel=4)。在这种情况下,TorchServe 会将 CUDA_VISIBLE_DEVICES=”0,1,2,3” 分配给 worker1,将 CUDA_VISIBLE_DEVICES=”4,5,6,7” 分配给 worker2。
除了这种默认行为,TorchServe 还提供了灵活性,允许用户为工作进程指定 GPU。例如,如果用户在模型配置 YAML 文件中设置了“deviceIds: [2,3,4,5]”,并将 nproc-per-node(或 parallelLevel)设置为 2,则 TorchServe 会将 CUDA_VISIBLE_DEVICES=”2,3” 分配给 worker1,将 CUDA_VISIBLE_DEVICES=”4,5” 分配给 worker2。
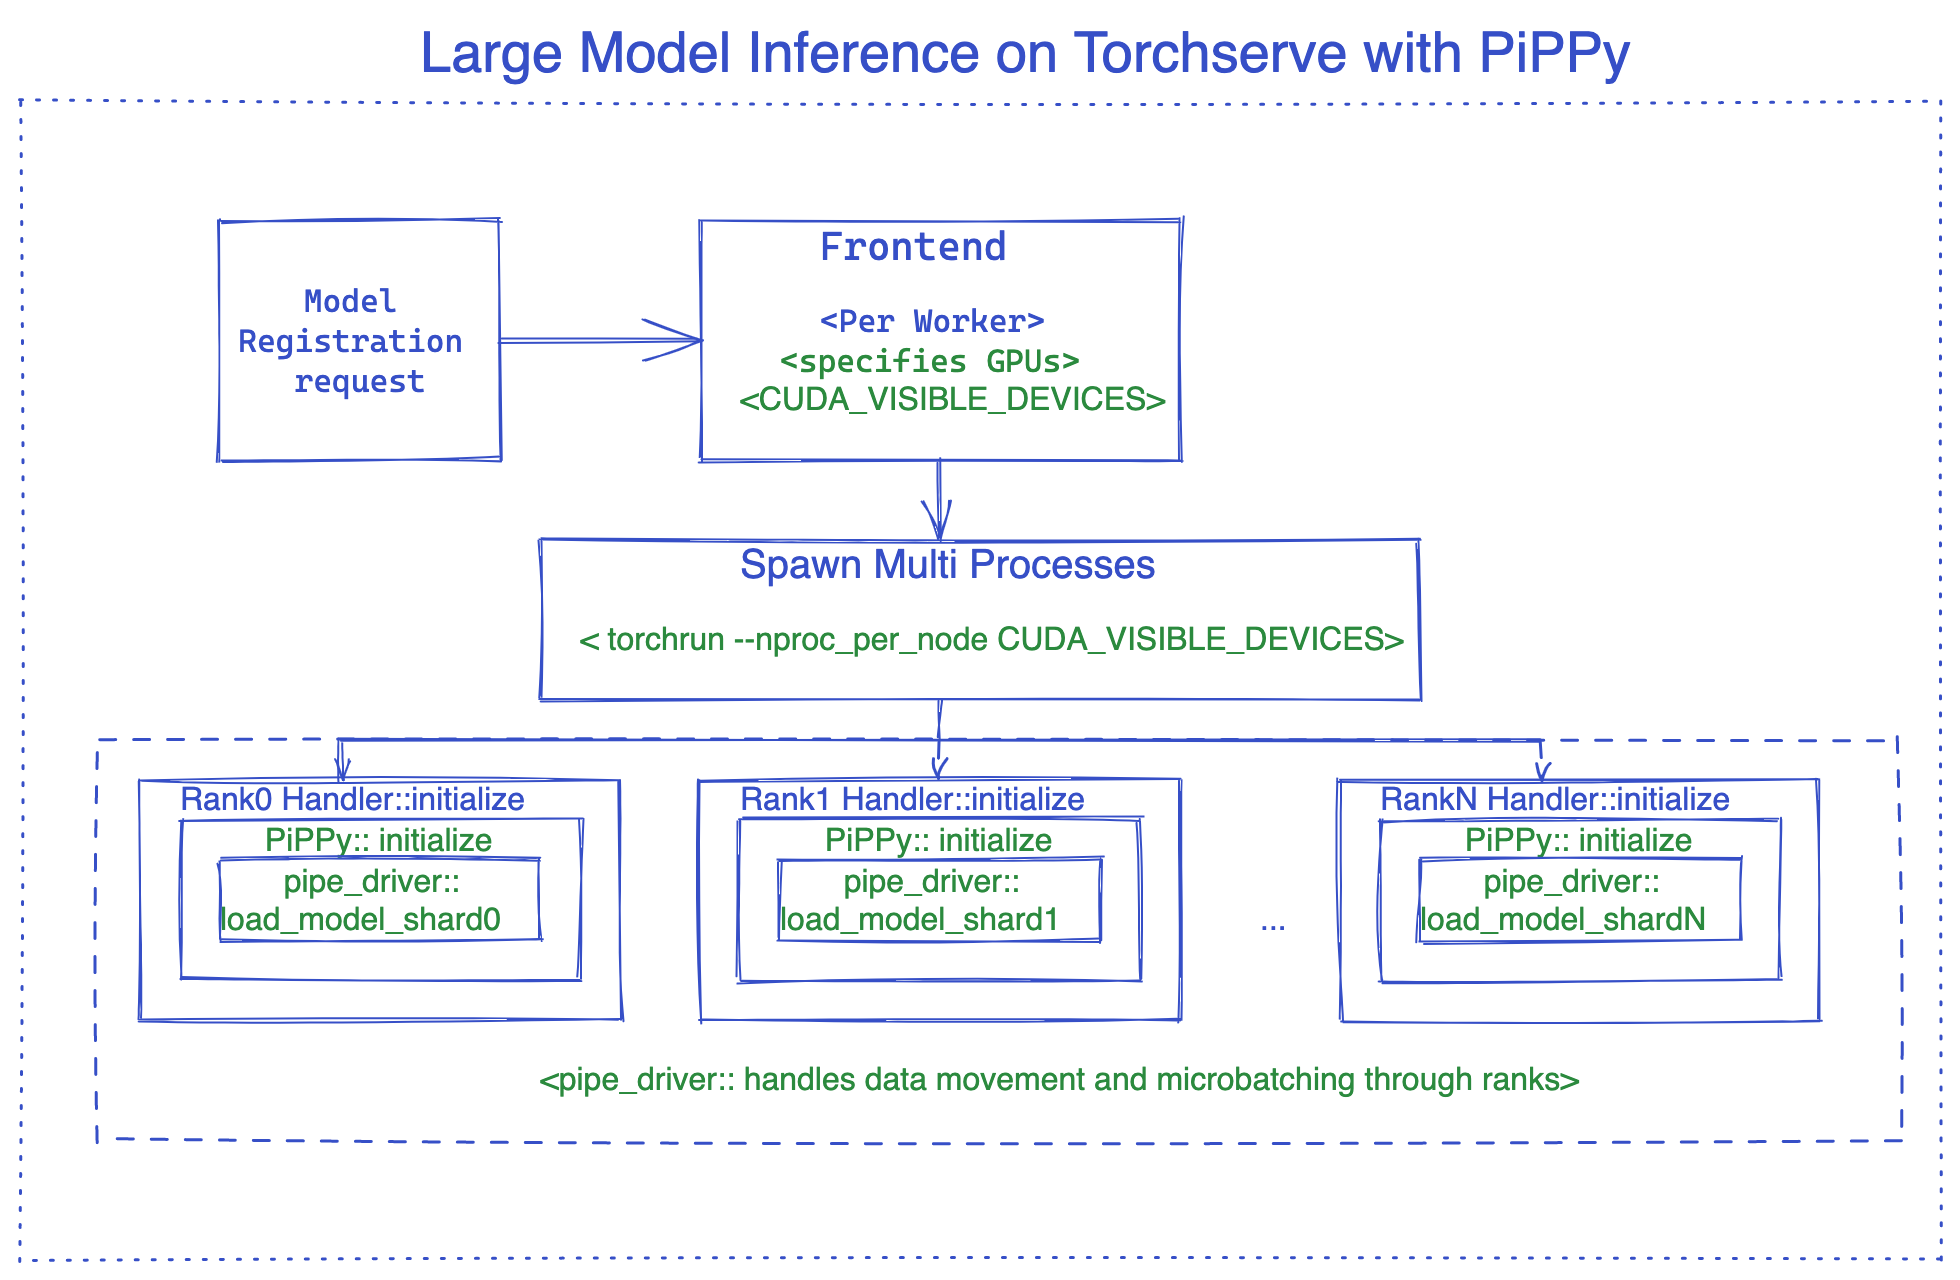
以 PiPPy 集成为例,下图展示了 TorchServe 大型模型推理的内部工作原理。有关使用 vLLM 的示例,请参见此示例。
PiPPy(PyTorch 大型模型推理原生解决方案)
PiPPy 为无法完全放入单个 GPU 的大型模型提供流水线并行支持。它会将您的模型分割成指定设备数量的、大小相等的部分(阶段)。然后使用微批处理来运行您的批处理输入进行推理(对于批量大小 >1 的情况更优化)。
如何在 Torchserve 中使用 PiPPy
要在 Torchserve 中使用 PiPPy,我们需要使用继承自 base_pippy_handler 的自定义处理程序,并将我们的设置放入 model-config.yaml 中。
Torchserve 中的自定义处理程序是一个简单的 Python 脚本,它定义了特定于您的工作流的模型加载、预处理、推理和后处理逻辑。
它看起来像下面这样:
创建 custom_handler.py 或其他具有描述性的名称的文件。
#DO import the necessary packages along with following
from ts.torch_handler.distributed.base_pippy_handler import BasePippyHandler
from ts.handler_utils.distributed.pt_pippy import initialize_rpc_workers, get_pipline_driver
class ModelHandler(BasePippyHandler, ABC):
    def __init__(self):
        super(ModelHandler, self).__init__()
        self.initialized = False

    def initialize(self, ctx):
        model = # load your model from model_dir
        self.device = self.local_rank %  torch.cuda.device_count()# being used to move model inputs to (self.device)
        self.model = get_pipline_driver(model,self.world_size, ctx)
您的 model-config.yaml 文件需要如下所示,该配置文件非常灵活,您可以添加与前端、后端和处理程序相关的设置。
#frontend settings
minWorkers: 1
maxWorkers: 1
maxBatchDelay: 100
responseTimeout: 120
deviceType: "gpu"
parallelType: "pp" # options depending on the solution, pp(pipeline parallelism), tp(tensor parallelism), pptp ( pipeline and tensor parallelism)
                   # This will be used to route input to either rank0 or all ranks from fontend based on the solution (e.g. DeepSpeed support tp, PiPPy support pp)
torchrun:
    nproc-per-node: 4 # specifies the number of processes torchrun starts to serve your model, set to world_size or number of
                      # gpus you wish to split your model
#backend settings
pippy:
    chunks: 1 # This sets the microbatch sizes, microbatch = batch size/ chunks
    input_names: ['input_ids'] # input arg names to the model, this is required for FX tracing
    model_type: "HF" # set the model type to HF if you are using Huggingface model other wise leave it blank or any other model you use.
    rpc_timeout: 1800
    num_worker_threads: 512 #set number of threads for rpc worker init.

handler:
    max_length: 80 # max length of tokens for tokenizer in the handler
如何在处理程序中访问它? 这是一个例子:
def initialize(self, ctx):
    model_type = ctx.model_yaml_config["pippy"]["model_type"]
其余部分与 Torchserve 中的常规操作相同,基本上是打包您的模型并启动服务器。
打包模型的命令示例,请确保传递 model-config.yaml 文件:
torch-model-archiver --model-name bloom --version 1.0 --handler pippy_handler.py --extra-files $MODEL_CHECKPOINTS_PATH -r requirements.txt --config-file model-config.yaml --archive-format tgz
张量并行支持正在进行中,一旦就绪就会添加。
DeepSpeed
DeepSpeed-Inference 是微软的一个开源项目。它为服务无法完全放入单个 GPU 内存中的大型基于 Transformer 的 PyTorch 模型提供了模型并行支持。
如何在 TorchServe 中使用 DeepSpeed
要在 TorchServe 中使用 DeepSpeed,我们需要使用继承自 base_deepspeed_handler 的自定义处理程序,并将我们的设置放入 model-config.yaml 中。
它看起来像下面这样:
创建 custom_handler.py 或其他具有描述性的名称的文件。
#DO import the necessary packages along with following
from ts.handler_utils.distributed.deepspeed import get_ds_engine
from ts.torch_handler.distributed.base_deepspeed_handler import BaseDeepSpeedHandler
class ModelHandler(BaseDeepSpeedHandler, ABC):
    def __init__(self):
        super(ModelHandler, self).__init__()
        self.initialized = False

    def initialize(self, ctx):
        model = # load your model from model_dir
        ds_engine = get_ds_engine(self.model, ctx)
        self.model = ds_engine.module
        self.initialized = True
您的 model-config.yaml 文件需要如下所示,该配置文件非常灵活,您可以添加与前端、后端和处理程序相关的设置。
#frontend settings
minWorkers: 1
maxWorkers: 1
maxBatchDelay: 100
responseTimeout: 120
deviceType: "gpu"
parallelType: "tp" # options depending on the solution, pp(pipeline parallelism), tp(tensor parallelism), pptp ( pipeline and tensor parallelism)
                   # This will be used to route input to either rank0 or all ranks from fontend based on the solution (e.g. DeepSpeed support tp, PiPPy support pp)
torchrun:
    nproc-per-node: 4 # specifies the number of processes torchrun starts to serve your model, set to world_size or number of
                      # gpus you wish to split your model
#backend settings
deepspeed:
    config: ds-config.json # DeepSpeed config json filename.
                           # Details:https://deepspeed.org.cn/docs/config-json/
handler:
    max_length: 80 # max length of tokens for tokenizer in the handler
这里是一个 ds-config.json 的例子:
{
  "dtype": "torch.float16",
  "replace_with_kernel_inject": true,
  "tensor_parallel": {
    "tp_size": 2
  }
}
安装 DeepSpeed
方法 1: requirements.txt
方法 2: 通过命令预安装(推荐用于加快模型加载速度)
# See https://deepspeed.org.cn/tutorials/advanced-install/
DS_BUILD_OPS=1 pip install deepspeed
其余部分与 Torchserve 中的常规操作相同,基本上是打包您的模型并启动服务器。
打包模型的命令示例,请确保传递 model-config.yaml 文件:
# option 1: Using model_dir
torch-model-archiver --model-name bloom --version 1.0 --handler deepspeed_handler.py --extra-files $MODEL_CHECKPOINTS_PATH,ds-config.json -r requirements.txt --config-file model-config.yaml --archive-format tgz

# option 2: Using HF model_name
torch-model-archiver --model-name bloom --version 1.0 --handler deepspeed_handler.py --extra-files ds-config.json -r requirements.txt --config-file model-config.yaml --archive-format
DeepSpeed MII
如果使用此处所示的受支持模型之一,您可以利用 Deep Speed MII 的优势。Deep Speed MII 使用 Deep Speed Inference 以及深度学习领域的进一步进展来最小化延迟并最大化吞吐量。它针对特定的模型类型、模型大小、批量大小和可用硬件资源进行优化。
有关如何在受支持模型上利用 Deep Speed MII 的更多信息,请参阅此处的信息。您还可以在此处找到如何将其应用于 TorchServe 的示例。
使用 Accelerate 提供大型 Hugging Face 模型服务
如果使用大型 Hugging Face 模型但资源有限,您可以使用 accelerate 来提供这些模型服务。为此,您需要在 setup_config.json 文件中设置 low_cpu_mem_usage=True 和设置 `device_map=”auto”。
有关将 accelerate 与大型 Hugging Face 模型一起使用的更多信息,请参阅此示例。
大型模型推理技巧
减少模型加载延迟
为了减少模型延迟,我们建议:
在容器或主机上预安装模型并行库,例如 Deepspeed。
预下载模型检查点。例如,如果使用 HuggingFace,可以通过 Download_model.py 脚本预下载预训练模型。
设置环境变量 HUGGINGFACE_HUB_CACHE 和 TRANSFORMERS_CACHE
通过工具 Download_model.py 将模型下载到 HuggingFace 缓存目录。
调整模型配置 YAML 文件
您可以调整模型配置 YAML 文件以获得更好的性能,方法如下:
如果模型推理延迟较高导致响应超时,请更新 responseTimeout。
如果模型加载延迟较高导致启动超时,请更新 startupTimeout。
调整 torchrun 参数。支持的参数定义在此处。例如,默认情况下,
OMP_NUMBER_THREADS为 1。可以在 YAML 文件中修改此参数。
#frontend settings
torchrun:
    nproc-per-node: 4 # specifies the number of processes torchrun starts to serve your model, set to world_size or number of
                      # gpus you wish to split your model
    OMP_NUMBER_THREADS: 2
延迟敏感型应用
Job Ticket
Job Ticket 功能推荐用于延迟敏感型推理场景。启用 Job Ticket 后,TorchServe 会验证模型是否存在可用于处理客户端请求的活动工作进程。如果存在活动工作进程,请求会被接受并立即处理,无需等待作业队列或动态批处理;否则,会向客户端返回 503 响应。
此功能有助于处理推理延迟可能较高的使用案例,例如生成模型、像 chatGPT 这样的自回归解码器模型。此功能帮助这类应用根据业务需求采取有效行动,例如将拒绝的请求路由到不同的服务器,或扩展模型服务器容量。以下是启用 Job Ticket 的示例:
minWorkers: 2
maxWorkers: 2
jobQueueSize: 2
useJobTicket: true
在此示例中,一个模型有 2 个工作进程,作业队列大小为 2。推理请求要么立即由 TorchServe 处理,要么被拒绝并返回响应代码 503。
通过 HTTP 1.1 分块编码进行流式响应
TorchServe 的推理 API 支持流式响应,允许通过 HTTP 1.1 分块编码发送一系列推理响应。此功能仅推荐用于完整响应推理延迟较高且推理中间结果会发送给客户端的场景。一个例子是用于生成应用的 LLMs,其中生成“n”个 token 的延迟可能很高。在这种情况下,用户可以在每个生成的 token 就绪时接收,直到完整响应完成。要实现流式响应,后端处理程序调用“send_intermediate_predict_response”将一个中间结果发送到前端,并以现有方式返回最后一个结果。例如,
from ts.handler_utils.utils import send_intermediate_predict_response
''' Note: TorchServe v1.0.0 will deprecate
"from ts.protocol.otf_message_handler import send_intermediate_predict_response".
Please replace it with "from ts.handler_utils.utils import send_intermediate_predict_response".
'''
def handle(data, context):
    if type(data) is list:
        for i in range (3):
            send_intermediate_predict_response(["intermediate_response"], context.request_ids, "Intermediate Prediction success", 200, context)
        return ["hello world "]
客户端接收分块数据。
import test_utils

def test_echo_stream_inference():
    test_utils.start_torchserve(no_config_snapshots=True, gen_mar=False)
    test_utils.register_model('echo_stream',
                              'https://torchserve.pytorch.org/mar_files/echo_stream.mar')

    response = requests.post(TF_INFERENCE_API + '/predictions/echo_stream', data="foo", stream=True)
    assert response.headers['Transfer-Encoding'] == 'chunked'

    prediction = []
    for chunk in (response.iter_content(chunk_size=None)):
        if chunk:
            prediction.append(chunk.decode("utf-8"))

    assert str(" ".join(prediction)) == "hello hello hello hello world "
    test_utils.unregister_model('echo_stream')
GRPC 服务器端流
TorchServe GRPC API 添加了推理 API “StreamPredictions” 的服务器端流支持,允许通过同一个 GRPC 流发送一系列推理响应。此 API 仅推荐用于完整响应推理延迟较高且推理中间结果会发送给客户端的场景。一个例子是用于生成应用的 LLMs,其中生成“n”个 token 的延迟可能很高。与 HTTP 1.1 分块编码类似,通过此功能,用户可以在每个生成的 token 就绪时接收,直到完整响应完成。此 API 自动强制 batchSize 为 1。
service InferenceAPIsService {
    // Check health status of the TorchServe server.
    rpc Ping(google.protobuf.Empty) returns (TorchServeHealthResponse) {}

    // Predictions entry point to get inference using default model version.
    rpc Predictions(PredictionsRequest) returns (PredictionResponse) {}

    // Streaming response for an inference request.
    rpc StreamPredictions(PredictionsRequest) returns (stream PredictionResponse) {}
}
后端处理程序调用“send_intermediate_predict_response”将一个中间结果发送到前端,并以现有方式返回最后一个结果。例如
from ts.handler_utils.utils import send_intermediate_predict_response
''' Note: TorchServe v1.0.0 will deprecate
"from ts.protocol.otf_message_handler import send_intermediate_predict_response".
Please replace it with "from ts.handler_utils.utils import send_intermediate_predict_response".
'''


def handle(data, context):
    if type(data) is list:
        for i in range (3):
            send_intermediate_predict_response(["intermediate_response"], context.request_ids, "Intermediate Prediction success", 200, context)
        return ["hello world "]
