大型语言模型 (LLM) 通过海量数据训练,并使用数十亿参数来支持问答、语言翻译和句子补全等任务。使用 LLM 时会遇到一些挑战,例如领域知识空白、事实准确性问题和幻觉,这些问题会影响其可靠性,尤其是在医疗、法律或工程等需要高准确性的领域。检索增强生成 (RAG) 通过使用特定领域或组织的内部知识库增强 LLM,而无需重新训练模型,从而提供了一种缓解其中一些问题的解决方案。
RAG 知识源通常是业务特定的数据库,这些数据库通常部署在通用 CPU 基础设施上。因此,将 RAG 部署在通用 CPU 基础设施以及相关的业务服务上既高效又具成本效益。基于此,我们评估了在AWS Graviton 驱动的 Amazon EC2 实例上部署 RAG,这些实例已在大多数工作负载(包括数据库、内存缓存、大数据分析、媒体编解码器、游戏服务器和机器学习推理)方面提供了高达40% 的性价比优势。
过去,我们发布了一些博客文章,介绍了如何优化 PyTorch 以适用于 AWS Graviton 处理器,以加速 ML 推理性能,包括 eager 模式 (博客) 和 torch.compile 模式 (博客)。在本博客中,我们将介绍如何使用 PyTorch 和 torch.compile 部署典型的 RAG 工作负载,以及我们如何将基于 AWS Graviton3 的 m7g.xlarge 实例上的嵌入模型性能提升了 **1.7 倍**,RAG 查询性能提升了 **1.3 倍**,与默认的 PyTorch“eager 模式”相比,最后是一些可应用于 RAG 用例的建议。
如何优化 RAG?
没有 RAG,LLM 接收用户输入并根据其训练信息(它已知的信息)创建响应。有了 RAG,引入了一个信息检索组件,该组件利用用户输入首先从新数据源中提取信息。用户查询和相关信息都提供给 LLM。LLM 利用新知识和其训练数据创建更好的响应。下图显示了使用 RAG 和 LLM 的概念流程。
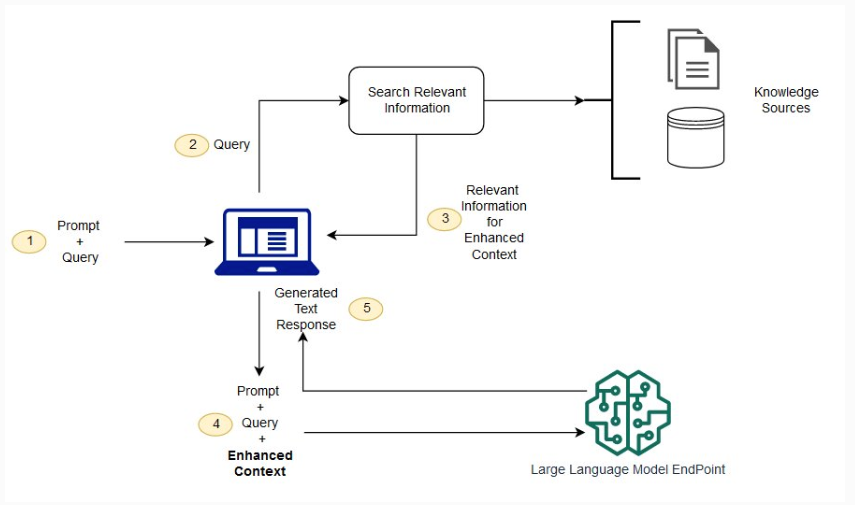
图 1:使用 RAG 和 LLM 的概念流程
来源:https://aws.amazon.com/what-is/retrieval-augmented-generation/
嵌入模型
RAG 的核心是一个嵌入模型,它接收文本数据并将其转换为向量表示。这些向量然后存储在向量数据库中。当用户进行查询时,查询首先被转换为向量,然后 RAG 在向量数据库上进行相似性搜索。因此,优化 RAG 性能的第一步是优化嵌入模型的推理性能。我们使用基于 AWS Graviton3 的 m7g.xlarge 实例和 HuggingFace sentence-transformer 嵌入模型进行优化工作。以下是使用 PyTorch Eager 模式对 HuggingFace sentence-transformer 嵌入模型推理进行分析的示例脚本。
import torch
from torch.profiler import profile, ProfilerActivity, record_function
from transformers import AutoModel, AutoTokenizer

model_name = "sentence-transformers/all-mpnet-base-v2"
input_text = ["This is an example sentence", "Each sentence is converted"]

model = AutoModel.from_pretrained(model_name)
tokenizer = AutoTokenizer.from_pretrained(model_name)

encoded_input = tokenizer(
    input_text, padding=True, truncation=True, return_tensors="pt"
)

warmup, actual = 100, 100
model.eval()

with torch.no_grad():
    # warmup
    for i in range(warmup):
        embeddings = model(**encoded_input)

    with profile(activities=[ProfilerActivity.CPU]) as prof:
        with record_function("model_inference"):
            for i in range(actual):
                embeddings = model(**encoded_input)
        print(prof.key_averages().table(sort_by="self_cpu_time_total"))
Eager 模式
由于 PyTorch eager 模式已经通过以下运行时环境设置在 AWS Graviton 处理器上进行了优化,我们将其纳入基线并测量了以下性能。有关如何在 AWS Graviton 处理器上优化 PyTorch eager 模式的更多详细信息,请参阅使用 AWS Graviton 处理器优化 PyTorch 2.0 推理。
# Enable the fast math GEMM kernels, to accelerate fp32 inference with bfloat16 gemm
export DNNL_DEFAULT_FPMATH_MODE=BF16

# Enable Linux Transparent Huge Page (THP) allocations,
# to reduce the tensor memory allocation latency
export THP_MEM_ALLOC_ENABLE=1

# Set LRU Cache capacity to cache the primitives and avoid redundant
# memory allocations
export LRU_CACHE_CAPACITY=1024
---------------------------  ------------  ------------  ------------  ------------  ------------  ------------
                       Name    Self CPU %      Self CPU   CPU total %     CPU total  CPU time avg    # of Calls
---------------------------  ------------  ------------  ------------  ------------  ------------  ------------
                aten::addmm        61.01%        2.638s        62.49%        2.702s     370.197us          7300
            model_inference        12.01%     519.161ms       100.00%        4.324s        4.324s             1
                  aten::bmm         6.25%     270.084ms        11.96%     517.089ms     215.454us          2400
               aten::select         3.98%     172.165ms         5.34%     230.863ms       1.331us        173500
                aten::copy_         2.11%      91.133ms         2.11%      91.133ms       6.200us         14700
---------------------------  ------------  ------------  ------------  ------------  ------------  ------------
Self CPU time total: 4.324s
表 1:使用 PyTorch Eager 模式在基于 AWS Graviton3 的 m7g.xlarge 实例上进行 HuggingFace sentence-transformer 嵌入模型推理的性能分析输出
接下来,我们添加了 torch.compile、权重预打包和 torch.inference_mode,并观察到大约 1.7 倍的性能提升。以下部分讨论了这些优化以及由此产生的加速。
torch.compile
与 eager 模式相反,torch.compile 以针对给定硬件优化的方式将整个模型预编译成单个图。有关 torch.compile 功能以及我们如何在 AWS Graviton 处理器上对其进行优化的更多详细信息,请参阅使用 AWS Graviton 处理器上的 torch.compile 加速 PyTorch 推理。如以下代码片段所示调用 torch.compile 以触发模型的 PyTorch dynamo 编译。这导致与基线相比性能提升了约 1.04 倍。
model = torch.compile(model)

----------------------------  ------------  ------------  ------------  ------------  ------------  ------------
                        Name    Self CPU %      Self CPU   CPU total %     CPU total  CPU time avg    # of Calls
----------------------------  ------------  ------------  ------------  ------------  ------------  ------------
                 aten::addmm        64.46%        2.675s        66.66%        2.766s     378.905us          7300
       Torch-Compiled Region        19.76%     820.085ms        99.04%        4.109s      41.094ms           100
                   aten::bmm         6.66%     276.216ms        12.52%     519.527ms     216.470us          2400
                aten::select         3.98%     164.991ms         5.41%     224.488ms       1.299us        172800
            aten::as_strided         1.66%      69.039ms         1.66%      69.039ms       0.383us        180100
----------------------------  ------------  ------------  ------------  ------------  ------------  ------------
Self CPU time total: 4.149s
表 2:使用 torch.compile 模式在基于 AWS Graviton3 的 m7g.xlarge 实例上进行 HuggingFace sentence-transformer 嵌入模型推理的性能分析输出
权重预打包
torch.compile 提供了在模型编译期间将模型权重预打包为更适合给定硬件的格式的机会,从而提高了性能。设置以下配置以触发权重预打包。这导致与基线相比提升了约 1.69 倍。
import torch._inductor.config as config
config.cpp.weight_prepack=True
config.freezing=True
-----------------------------  ------------  ------------  ------------  ------------  ------------  ------------
                         Name    Self CPU %      Self CPU   CPU total %     CPU total  CPU time avg    # of Calls
-----------------------------  ------------  ------------  ------------  ------------  ------------  ------------
    mkldnn::_linear_pointwise        39.10%     994.821ms        41.50%        1.056s     144.628us          7300
        Torch-Compiled Region        35.12%     893.675ms        98.42%        2.504s      25.043ms           100
                    aten::bmm        10.96%     278.859ms        21.66%     551.073ms     229.614us          2400
                 aten::select         7.34%     186.838ms         9.98%     253.840ms       1.469us        172800
             aten::as_strided         2.63%      67.002ms         2.63%      67.002ms       0.388us        172800
-----------------------------  ------------  ------------  ------------  ------------  ------------  ------------
Self CPU time total: 2.544s
表 3:使用 torch.compile 和权重预打包在基于 AWS Graviton3 的 m7g.xlarge 实例上进行 HuggingFace sentence-transformer 嵌入模型推理的性能分析输出
torch.inference_mode
此外,使用 torch.inference_mode() 可以通过关闭张量版本控制和张量视图跟踪来节省开销。有关更多详细信息,请参阅 PyTorch 文档。
with torch.inference_mode():
# instead of
with torch.no_grad():
-----------------------------  ------------  ------------  ------------  ------------  ------------  ------------
                         Name    Self CPU %      Self CPU   CPU total %     CPU total  CPU time avg    # of Calls
-----------------------------  ------------  ------------  ------------  ------------  ------------  ------------
    mkldnn::_linear_pointwise        38.92%     987.276ms        41.17%        1.044s     143.056us          7300
        Torch-Compiled Region        34.92%     885.895ms        98.45%        2.498s      24.975ms           100
                    aten::bmm        11.25%     285.292ms        22.22%     563.594ms     234.831us          2400
                 aten::select         7.74%     196.223ms        10.22%     259.251ms       1.500us        172800
             aten::as_strided         2.48%      63.027ms         2.48%      63.027ms       0.365us        172800
-----------------------------  ------------  ------------  ------------  ------------  ------------  ------------
Self CPU time total: 2.537s
表 4:使用 torch.compile、权重预打包和 inference_mode 在基于 AWS Graviton3 的 m7g.xlarge 实例上进行 HuggingFace sentence-transformer 嵌入模型推理的性能分析输出
下表显示了独立嵌入模型推理所实现的增量性能改进。
| 优化级别 | 测量的延迟(秒) | 相对于基线的改进 |
| PyTorch eager 模式(基线) | 0.04324 | 不适用 |
| torch.compile | 0.04149 | 1.04 倍 |
| 权重预打包 | 0.02544 | 1.69 倍 |
| torch.inference_mode | 0.02537 | 1.70 倍 |
以下脚本是包含先前讨论的优化的嵌入模型推理的更新示例。优化已用 **绿色** 突出显示。
import torch
from torch.profiler import profile, record_function, ProfilerActivity
from transformers import AutoTokenizer, AutoModel
import torch._inductor.config as config
config.cpp.weight_prepack=True
config.freezing=True

model_name = "sentence-transformers/all-mpnet-base-v2"
input_text = ['This is an example sentence', 'Each sentence is converted']

model = AutoModel.from_pretrained(model_name)
tokenizer = AutoTokenizer.from_pretrained(model_name)

encoded_input = tokenizer(input_text, padding=True, truncation=True, return_tensors='pt')

warmup , actual = 100, 100
model.eval()
model = torch.compile(model)

with torch.inference_mode():
#instead of with torch.no_grad()
# warmup
  for i in range(warmup):
  	embeddings = model(**encoded_input)

  with profile(activities=[ProfilerActivity.CPU]) as prof:
	with record_function("model_inference"):
  	for i in range(actual):
     	embeddings = model(**encoded_input)
  print(prof.key_averages().table(sort_by="self_cpu_time_total"))
CPU 上的端到端 RAG 场景
在优化嵌入模型推理之后,我们从基于 PyTorch eager 模式的 RAG 设置开始,主要用于验证 CPU 后端的功能。我们使用 langchain_community.embeddings 中的HuggingFaceEmbeddings 构建了 RAG 解决方案,如以下代码片段所示。
from langchain_community.embeddings import HuggingFaceEmbeddings
from langchain_community.vectorstores import FAISS
from langchain.text_splitter import RecursiveCharacterTextSplitter
from langchain_community.document_loaders.recursive_url_loader import RecursiveUrlLoader
from langchain.prompts import PromptTemplate
from langchain_core.prompts import format_document
from bs4 import BeautifulSoup as Soup
import torch

url =  "https://pytorch.ac.cn/blog/pytorch2-5/"
chunk_size = 1000
chunk_overlap = 0
embedding_model = "sentence-transformers/all-mpnet-base-v2"
N = 5

question = "What's new in PyTorch 2.5?"

from transformers import AutoTokenizer, AutoModel
from typing import Any, List

loader = RecursiveUrlLoader(
            url=url, max_depth=3, extractor=lambda x: Soup(x, "html.parser").text
        )
docs = loader.load()

# Split the document into chunks with a specified chunk size
text_splitter = RecursiveCharacterTextSplitter(chunk_size=chunk_size, chunk_overlap=chunk_overlap)
all_splits = text_splitter.split_documents(docs)

# Store the document into a vector store with a specific embedding model
model = HuggingFaceEmbeddings(model_name=embedding_model)

warmup , actual = 100, 100

with torch.inference_mode():
    vectorstore = FAISS.from_documents(all_splits, model)

    for i in range(warmup):
        searchDocs = vectorstore.similarity_search(question, k=N)

    import time

    start = time.time()
    for i in range(actual):
        searchDocs = vectorstore.similarity_search(question, k=N)
    end = time.time()
    print(f"Time for 1 inference is {(end-start)/actual} seconds")

    doc_prompt = PromptTemplate.from_template("{page_content}")
    context = ""
    for i, doc in enumerate(searchDocs):
        context += f"\n{format_document(doc, doc_prompt)}\n"
接下来,我们的目标是使用 torch.compile 和权重预打包优化端到端 RAG 用例,这为独立的嵌入模型推理带来了 1.7 倍的改进。然而,这些优化并未直接适用于 RAG 场景。
在端到端 RAG 场景中实现类似增益的挑战和解决方案是什么?
挑战 1:模型句柄
无法获取使用 HuggingFaceEmbeddings 实例化的模型句柄,并且包装器类不提供编译 API。因此,我们的应用程序无法调用 torch.compile 来触发 PyTorch dynamo 编译过程。
解决方案
我们实现了自定义嵌入类,以便能够获取模型的句柄。这实例化了 sentence-transformers 中的嵌入模型,并维护了用于即时编译或稍后阶段编译的句柄。通过这种方式,我们能够触发 torch.compile,从而触发 dynamo 编译。
class CustomEmbedding(HuggingFaceEmbeddings):

    def __init__(self, **kwargs: Any):
        """Initialize the sentence_transformer."""
        super().__init__(**kwargs)

        # Load model from HuggingFace Hub
        self.client = AutoModel.from_pretrained(self.model_name)
    class Config:
        arbitrary_types_allowed = True


    def embed_documents(self, texts: List[str]) -> List[List[float]]:
        """Compute doc embeddings using a HuggingFace transformer model.
        Args:
            texts: The list of texts to embed.
        Returns:
            List of embeddings, one for each text.
        """

        texts = list(map(lambda x: x.replace("\n", " "), texts))

        # Tokenize sentences
        tokenizer = AutoTokenizer.from_pretrained(self.model_name)
        encoded_input = tokenizer(texts, padding=True, truncation=True, return_tensors='pt')

        embeddings = self.client(
           **encoded_input, output_hidden_states=True
        )
        embeddings = embeddings.pooler_output.detach().numpy()

        return embeddings.tolist()

# instead of model = HuggingFaceEmbeddings(model_name=embedding_model)
model = CustomEmbedding(model_name=embedding_model)

# torch.compile the model
model.client = torch.compile(model.client)
挑战 2:触发优化
对于典型的推理场景,当图冻结且梯度计算被禁用时,Torch inductor(我们用于 CPU 的编译器后端)会调用特定于硬件的优化,例如将图重写为性能更好的操作符、操作符融合和权重预打包。尽管 Torch dynamo 能够看到模型并触发通用编译,但它未能触发 Torch inductor 中的这些额外的 Fx 传递。
Torch inductor 未触发优化传递主要有两个原因:(1) 应用程序没有设置 no_grad() 或 inference_mode(),导致 torch inductor 无法检测到图已冻结;(2) 我们遇到了 torch.compile 框架的一个限制,即如果 no_grad 仅在编译区域的开头设置,那么 torch.compile 在调用 inductor Fx 传递时将无法检测到它,因为它那时还没有到达 no_grad 区域。有关更多详细信息,请参阅此 GitHub issue。
解决方案
我们通过将 no_grad() 上下文从模型类内部移到应用程序代码中来解决此限制。这样,模型编译按预期进行,当我们在 eager 和编译版本中分析稳定推理传递时,性能提升了约 1.3 倍。
挑战 3:额外编译
通过之前的修复,查询查找推理性能得到了改善,但基准测试脚本的总执行时间没有改善。我们追溯到 RAG 推理期间模型的冗余编译。进一步深入研究发现,这是因为词嵌入和 RAG 查询阶段之间的批处理大小不匹配。例如,在我们的基准测试脚本中,当数据库被向量化并存储在向量数据库中时,我们使用批处理大小为 16,因此模型使用形状为 **16**xNxK 的张量进行编译。然而,RAG 查询查找通常是形状为 **1**xNxK 的单个请求。因此,批处理大小不匹配(这些张量的维度“0”)触发了查询查找阶段的重新编译。我们通过以下 Torch 日志确认了这一点:TORCH_LOGS="recompiles"
TORCH_LOGS="recompiles" python rag_compile.py
V1103 02:48:08.805986 34281 site-packages/torch/_dynamo/guards.py:2813] [0/1] [__recompiles] Recompiling function forward in site-packages/transformers/models/mpnet/modeling_mpnet.py:502
V1103 02:48:08.805986 34281 site-packages/torch/_dynamo/guards.py:2813] [0/1] [__recompiles]     triggered by the following guard failure(s):
V1103 02:48:08.805986 34281 site-packages/torch/_dynamo/guards.py:2813] [0/1] [__recompiles]     - 0/0: tensor 'L['input_ids']' size mismatch at index 0. expected 16, actual 1
解决方案
Torch dynamo 提供了一个装饰器,用于将给定张量的维度标记为动态并指定其预期值,以便不会触发重新编译。例如,将 input_ids 和 attention_mask 的维度“0”指定为动态,并指定该维度允许值为“1”(如以下代码片段所示),应该可以避免冗余编译。
torch._dynamo.decorators.mark_unbacked(encoded_input['input_ids'], 0)
torch._dynamo.mark_dynamic(encoded_input['input_ids'], 1)
        torch._dynamo.decorators.mark_unbacked(encoded_input['attention_mask'], 0)
torch._dynamo.mark_dynamic(encoded_input['attention_mask'], 1)
然而,Torch dynamo 装饰器和标记在这种特定情况下不起作用。此外,使用装饰器会创建图形中断。因此,我们添加了一些预热迭代来隐藏编译延迟,并在稳定状态下分析查询查找性能。然而,好消息是,在实践中,这种重新编译仅在第一次查询时触发,因此如果数据库大小是固定的,它可能不会影响生产场景。此外,PyTorch AOT Inductor(PyTorch 中的一项新功能)解决了 torch.compile 的重新编译和预热挑战。在后续博客中,我们将讨论如何在生产环境中使用 AOT Inductor 来解决这些挑战。
通过这些解决方案,我们能够将 torch.compile、权重预打包和 AWS Graviton 特定优化应用于端到端 RAG 场景,并将性能从基线 eager 模式提高了 1.3 倍。
部署
有关如何在基于 AWS Graviton 的 Amazon EC2 实例上部署 torch 编译的 RAG 以及如何结合 Llama 和TorchServe 部署它的详细指南,请参见PyTorch 网站。
结论
在本博客中,我们介绍了如何优化基于 AWS Graviton3 的 EC2 实例上的嵌入模型推理性能。我们还分享了遇到的挑战、我们为 RAG 用例实现这些解决方案的方法以及由此产生的加速。我们希望您能尝试一下!如果您需要 Graviton 上 ML 软件的任何支持,请在 AWS Graviton 技术指南GitHub 上提交问题。
我们要感谢 Eli Uriegas 为本文提供支持。
作者
Sunita Nadampalli 是 AWS 的首席工程师和 AI/ML 专家。她领导 AWS Graviton 软件性能优化,涉及 AI/ML 和 HPC 工作负载。她热衷于开源软件开发,并为基于 Arm ISA 的 SoC 提供高性能和可持续的软件解决方案。
Ankith Gunapal 是 Meta (PyTorch) 的 AI 合作伙伴工程师。他负责 TorchServe 的客户支持、推广和发布工程。他热衷于解决模型推理和模型服务中的生产问题。他还喜欢以用户友好的格式提炼技术复杂的材料。
Hamid Shojanazeri 领导 Meta 的 AI 框架合作伙伴工程团队。他热衷于构建可扩展的 AI 解决方案,并专注于使用 PyTorch 应对大规模分布式训练、推理、模型服务和优化方面的挑战。