Triton 开源编程语言和编译器提供了一种高级的、基于 Python 的方法来创建高效的 GPU 代码。在本博客中,我们将重点介绍 Triton 程序如何编译以及中间表示的底层细节。有关 Triton 的介绍,我们建议读者参阅此博客。
Triton 语言和编译
Triton 编程语言支持不同类型的现代 GPU,并遵循分块编程方法。例如,我们将稍微修改并遵循Triton 向量加法教程。向量加法内核和辅助函数定义如下
import torch
import triton
import triton.language as tl

@triton.jit
def add_kernel(x_ptr,  # *Pointer* to first input vector.
               y_ptr,  # *Pointer* to second input vector.
               output_ptr,  # *Pointer* to output vector.
               n_elements,
               BLOCK_SIZE: tl.constexpr,
               ):

    pid = tl.program_id(axis=0)
    block_start = pid * BLOCK_SIZE
    offsets = block_start + tl.arange(0, BLOCK_SIZE)

    mask = offsets < n_elements

    x = tl.load(x_ptr + offsets, mask=mask)
    y = tl.load(y_ptr + offsets, mask=mask)
    output = x + y
    tl.store(output_ptr + offsets, output, mask=mask)

def add(x: torch.Tensor, y: torch.Tensor):
    output = torch.empty_like(x)
    assert x.is_cuda and y.is_cuda and output.is_cuda
    n_elements = output.numel()

    grid = lambda meta: (triton.cdiv(n_elements, meta['BLOCK_SIZE']), )
    triton_kernel=add_kernel[grid](x, y, output, n_elements, BLOCK_SIZE=1024)
    torch.cuda.synchronize()

    # Save compilation stages - some of the stages identified here are specific to NVIDIA devices:
    with open('triton_IR.txt', 'w') as f:
        print(triton_kernel.asm['ttir'], file=f)
    with open('triton_TTGIR.txt', 'w') as f:
        print(triton_kernel.asm['ttgir'], file=f)
    with open('triton_LLVMIR.txt', 'w') as f:
        print(triton_kernel.asm['llir'], file=f)
    with open('triton_PTX.ptx', 'w') as f:
        print(triton_kernel.asm['ptx'], file=f)
    with open('triton_cubin.txt', 'w') as f:
        print(triton_kernel.asm['cubin'], file=f)

    return output

torch.manual_seed(0)
size = 98432
x = torch.rand(size, device='cuda')
y = torch.rand(size, device='cuda')
output_torch = x + y
output_triton = add(x, y)
print(output_torch)
print(output_triton)
print(f'The maximum difference between torch and triton is '
      f'{torch.max(torch.abs(output_torch - output_triton))}')
Triton 向量加法内核包含 @triton.jit 装饰器。Triton 编译器将编译用 @triton.jit 标记的函数,该函数将通过多个编译阶段进行降级。辅助函数 add 分配输出张量,计算适当的 GPU 网格大小,并另外保存中间编译阶段。
着重于编译过程,Triton 内核通过以下图所示的一系列阶段降级为特定于设备的汇编代码。
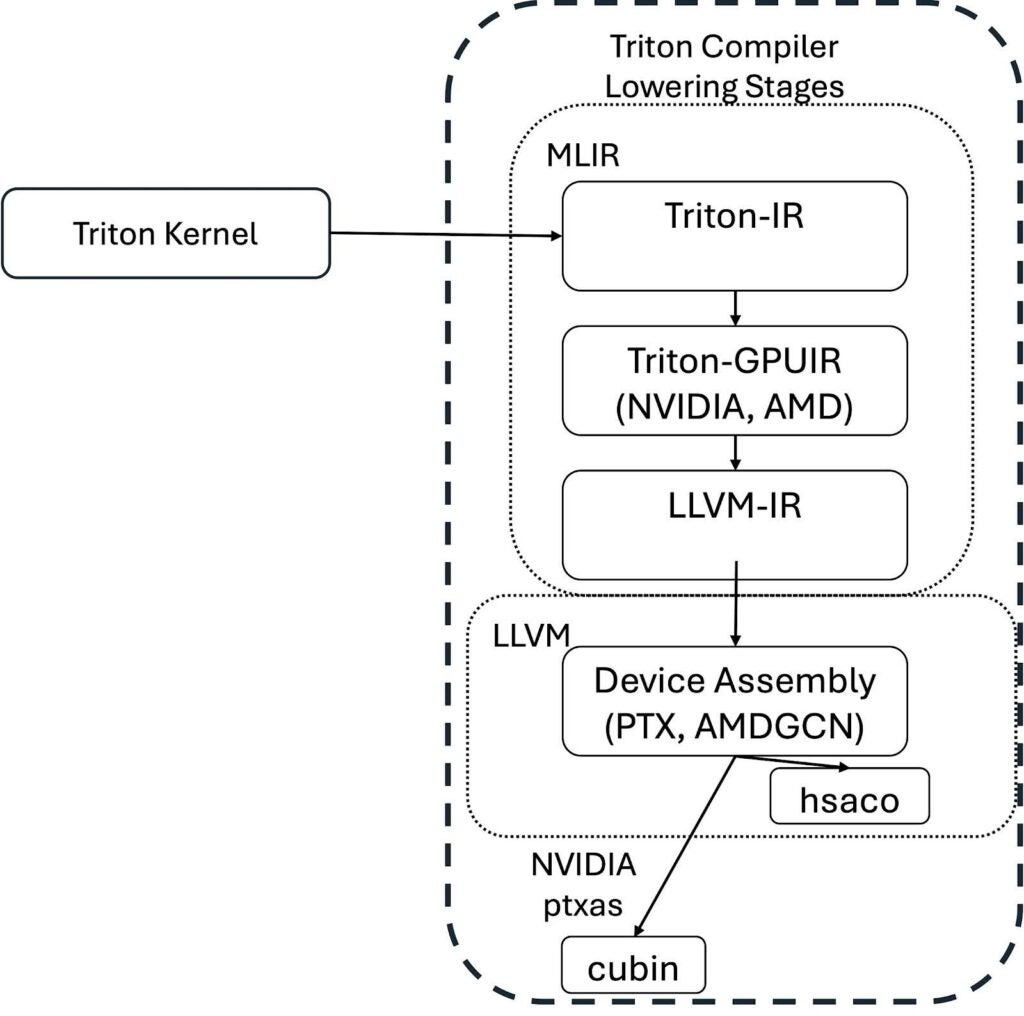
内核的编译过程是:首先遍历装饰过的 Python 函数的抽象语法树(AST)以创建 Triton 中间表示(Triton-IR)。Triton-IR 是一种未优化、与机器无关的中间表示。它引入了瓦片级编程要求,并基于开源 LLVM 编译器项目。接下来,Triton 编译器优化 Triton-IR 并将其转换为 Triton-GPU IR(Triton-TTGIR),然后转换为 LLVM-IR。Triton-IR 和 Triton-GPUIR 表示都以 MLIR 方言编写,MLIR 是 LLVM 的一个子项目,旨在改进异构硬件的编译。
对于 Triton 向量加法教程内核,示例 Triton IR 片段是
module {
  tt.func public @add_kernel(%arg0: !tt.ptr<f32> {tt.divisibility = 16 : i32} loc("/u/saraks/triton_blog/01-vector-add.py":28:0), %arg1: !tt.ptr<f32> {tt.divisibility = 16 : i32} loc("/u/saraks/triton_blog/01-vector-add.py":28:0), %arg2: !tt.ptr<f32> {tt.divisibility = 16 : i32} loc("/u/saraks/triton_blog/01-vector-add.py":28:0), %arg3: i32 {tt.divisibility = 16 : i32} loc("/u/saraks/triton_blog/01-vector-add.py":28:0)) attributes {noinline = false} {
    %c1024_i32 = arith.constant 1024 : i32 loc(#loc1)
    %0 = tt.get_program_id x : i32 loc(#loc2)
    %1 = arith.muli %0, %c1024_i32 : i32 loc(#loc3)
    %2 = tt.make_range {end = 1024 : i32, start = 0 : i32} : tensor<1024xi32> loc(#loc4)
    %3 = tt.splat %1 : i32 -> tensor<1024xi32> loc(#loc5)
    %4 = arith.addi %3, %2 : tensor<1024xi32> loc(#loc5)
    %5 = tt.splat %arg3 : i32 -> tensor<1024xi32> loc(#loc6)
    %6 = arith.cmpi slt, %4, %5 : tensor<1024xi32> loc(#loc6)
    %7 = tt.splat %arg0 : !tt.ptr<f32> -> tensor<1024x!tt.ptr<f32>> loc(#loc7)
    %8 = tt.addptr %7, %4 : tensor<1024x!tt.ptr<f32>>, tensor<1024xi32> loc(#loc7)
    %9 = tt.load %8, %6 : tensor<1024x!tt.ptr<f32>> loc(#loc8)
    %10 = tt.splat %arg1 : !tt.ptr<f32> -> tensor<1024x!tt.ptr<f32>> loc(#loc9)
    %11 = tt.addptr %10, %4 : tensor<1024x!tt.ptr<f32>>, tensor<1024xi32> loc(#loc9)
    %12 = tt.load %11, %6 : tensor<1024x!tt.ptr<f32>> loc(#loc10)
    %13 = arith.addf %9, %12 : tensor<1024xf32> loc(#loc11)
    %14 = tt.splat %arg2 : !tt.ptr<f32> -> tensor<1024x!tt.ptr<f32>> loc(#loc12)
    %15 = tt.addptr %14, %4 : tensor<1024x!tt.ptr<f32>>, tensor<1024xi32> loc(#loc12)
    tt.store %15, %13, %6 : tensor<1024x!tt.ptr<f32>> loc(#loc13)
    tt.return loc(#loc14)
  } loc(#loc)
} loc(#loc)
请注意,Triton 内核中的主要函数现在表示为
| Triton 内核 | Triton IR |
| x = tl.load(x_ptr + offsets, mask=mask) | %9 = tt.load %8, %6 : tensor<1024x!tt.ptr<f32>> loc(#loc8) |
| y = tl.load(y_ptr + offsets, mask=mask) | %12 = tt.load %11, %6 : tensor<1024x!tt.ptr<f32>> loc(#loc10) |
| output = x + y | %13 = arith.addf %9, %12 : tensor<1024xf32> loc(#loc11) |
| tl.store(output_ptr + offsets, output, mask=mask) | tt.store %15, %13, %6 : tensor<1024x!tt.ptr<f32>> loc(#loc13) |
在 Triton IR 阶段,%arg0: !tt.ptr<f32> 和随后的张量引用表明中间表示已经按数据类型进行了专门化。
我们在 Tesla V100-SXM2-32GB GPU 上运行了此示例,CUDA 版本为 12.2,Python 版本为 3.11.9,PyTorch 2.4.1 使用 PyTorch 默认安装的 Triton 版本。在此设备上,简单的向量加法具有以下 Triton GPU IR 片段,为清晰起见省略了部分行
#blocked = #triton_gpu.blocked<{sizePerThread = [4], threadsPerWarp = [32], warpsPerCTA = [4], order = [0]}>
module attributes {"triton_gpu.num-ctas" = 1 : i32, "triton_gpu.num-warps" = 4 : i32, triton_gpu.target = "cuda:70", "triton_gpu.threads-per-warp" = 32 : i32} {
  tt.func public @add_kernel(%arg0: !tt.ptr<f32> {tt.divisibility = 16 : i32}
    ⋮
    %9 = tt.load %8, %6 : tensor<1024x!tt.ptr<f32>, #blocked> loc(#loc8)
    ⋮
    %12 = tt.load %11, %6 : tensor<1024x!tt.ptr<f32>, #blocked> loc(#loc10)
    %13 = arith.addf %9, %12 : tensor<1024xf32, #blocked> loc(#loc11)
    ⋮
    tt.store %15, %13, %6 : tensor<1024x!tt.ptr<f32>, #blocked> loc(#loc13)
    ⋮
  } loc(#loc)
} loc(#loc)
在此阶段,包含了一些特定于硬件的信息。例如,计算能力以及张量如何分布到核心和 warps(对于 AMD GPU,则为 wavefronts)的详细信息。在此示例中,张量表示为 #blocked 布局。在此编码中,每个 warp 拥有张量的一个连续部分。目前,其他可能的内存优化包括 slice(沿维度重组和分布张量)、dot_op(用于块矩阵乘法的优化布局)、shared(指示 GPU 共享内存)、nvidia_mma(由 NVIDIA 张量核心生成)、amd_mfma(由 AMD MFMA 矩阵核心生成)和 amd_wmma(由 AMD WMMA 矩阵核心生成)等布局。正如最近的 Triton 会议上宣布的,这种布局表示将过渡到新的线性布局,以统一后端内部和跨后端布局。从 Triton-GPUIR 到 LLVM-IR 的阶段将 Triton-GPUIR 转换为 LLVM 的表示。目前,Triton 具有对 NVIDIA 和 AMD 设备的第三方后端支持,但其他设备的开发正在由开源社区积极进行。
为说明起见,下面显示了 LLVM-IR 向量加法参数的一小部分
  %19 = extractvalue { i32, i32, i32, i32 } %18, 0, !dbg !16
  %39 = extractvalue { i32, i32, i32, i32 } %38, 0, !dbg !18
  %23 = bitcast i32 %19 to float, !dbg !16
  %43 = bitcast i32 %39 to float, !dbg !18
  %56 = fadd float %23, %43, !dbg !19
在一些指针算术和内联汇编调用以从全局内存中检索数据之后,向量元素被提取并转换为正确的类型。最后,它们被加在一起,然后通过内联汇编表达式写入全局内存。
Triton 编译过程的最后阶段将 LLVM-IR 降级为特定于设备的二进制文件。对于示例向量加法,在 NVIDIA GPU 上,下一个中间表示是 PTX(并行线程执行)。低级 PTX 语法指定了 NVIDIA 设备在线程级别的执行,从 CUDA 1.0 版本开始。有关 PTX 的深入指南,请参阅NVIDIA 文档。在向量加法中,内核参数从主机传递到内核,地址被分配,并且 mov 指令促进线程级数据访问,最终用 add.f32 表示元素加法调用,例如下面的示例
add.f32 %f17, %f1, %f9// add type float32, output register, input register for x, input register for y
Triton 编译器协调最终阶段,由不同的硬件后端管理汇编代码如何编译为二进制文件。Triton 内核现在可以使用了。
总结
Triton 提供了一个高级抽象,用于为不同类型的硬件编程和编译内核。在这篇文章中,我们重点介绍了 Triton 代码表示和 Triton 编译器的不同阶段。有关包含自定义 Triton 内核或使用 Triton 内核加速不同工作负载的详细信息,请查看 PyTorch Triton 教程、关于 Triton GPTQ 内核、Llama3 FP8 推理与 Triton 和 LLM 的无 CUDA 推理 的博客文章,或 PyTorch 2.2 Triton 代码生成部分。