注意
跳转到末尾 下载完整示例代码
Torch Export with Cudagraphs
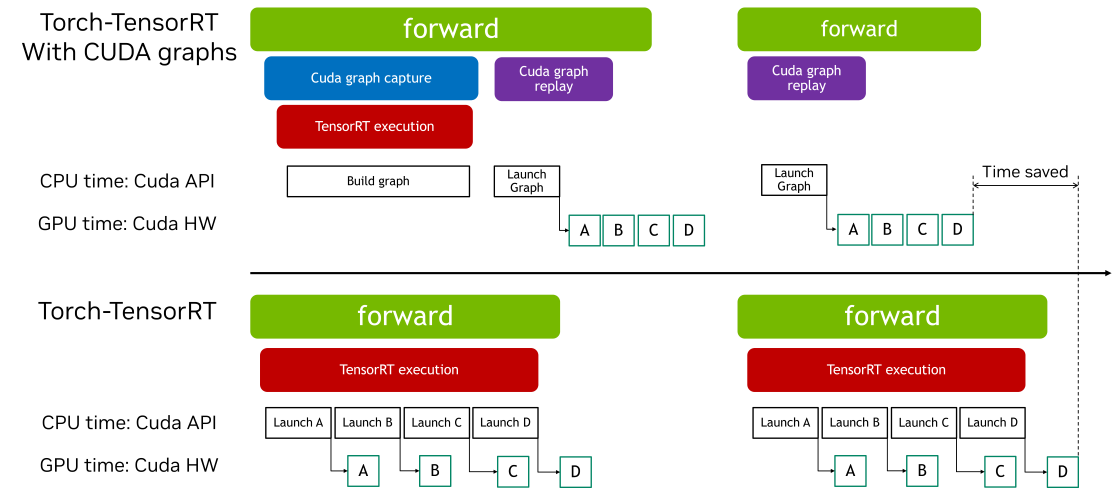
CUDA Graphs 允许通过单个 CPU 操作启动多个 GPU 操作,减少启动开销并提高 GPU 利用率。Torch-TensorRT 提供了简单的接口来启用 CUDA graphs。此功能使用户能够轻松利用 CUDA graphs 的性能优势,而无需手动管理捕获和重放的复杂性。

本交互式脚本旨在概述如何在 ir=”dynamo” 路径中使用 Torch-TensorRT Cudagraphs 集成的过程。该功能在 torch.compile 路径中也类似工作。
导入和模型定义
import torch
import torch_tensorrt
import torchvision.models as models
使用默认设置通过 torch_tensorrt.compile 进行编译
# We begin by defining and initializing a model
model = models.resnet18(pretrained=True).eval().to("cuda")

# Define sample inputs
inputs = torch.randn((16, 3, 224, 224)).cuda()
# Next, we compile the model using torch_tensorrt.compile
# We use the `ir="dynamo"` flag here, and `ir="torch_compile"` should
# work with cudagraphs as well.
opt = torch_tensorrt.compile(
    model,
    ir="dynamo",
    inputs=torch_tensorrt.Input(
        min_shape=(1, 3, 224, 224),
        opt_shape=(8, 3, 224, 224),
        max_shape=(16, 3, 224, 224),
        dtype=torch.float,
        name="x",
    ),
)
使用 Cudagraphs 集成进行推理
# We can enable the cudagraphs API with a context manager
with torch_tensorrt.runtime.enable_cudagraphs(opt) as cudagraphs_module:
    out_trt = cudagraphs_module(inputs)

# Alternatively, we can set the cudagraphs mode for the session
torch_tensorrt.runtime.set_cudagraphs_mode(True)
out_trt = opt(inputs)

# We can also turn off cudagraphs mode and perform inference as normal
torch_tensorrt.runtime.set_cudagraphs_mode(False)
out_trt = opt(inputs)
# If we provide new input shapes, cudagraphs will re-record the graph
inputs_2 = torch.randn((8, 3, 224, 224)).cuda()
inputs_3 = torch.randn((4, 3, 224, 224)).cuda()

with torch_tensorrt.runtime.enable_cudagraphs(opt) as cudagraphs_module:
    out_trt_2 = cudagraphs_module(inputs_2)
    out_trt_3 = cudagraphs_module(inputs_3)
使用包含 Graph Breaks 的 Module 的 Cuda Graphs
当 CUDA Graphs 应用于包含 Graph Breaks 的 TensorRT 模型时,每个中断都会引入额外的开销。发生这种情况是因为 Graph Breaks 阻止整个模型作为一个单一、连续的优化单元执行。因此,CUDA Graphs 通常提供的部分性能优势,例如减少的 Kernel 启动开销和改进的执行效率,可能会减弱。
使用带有 CUDA Graphs 的包装运行时模块可以让你将操作序列封装到图中,即使存在 Graph Breaks,也能高效执行。如果 TensorRT 模块存在 Graph Breaks,CUDA Graph 上下文管理器会返回一个 wrapped_module。这个模块捕获整个执行图,通过减少 Kernel 启动开销和提高性能,在后续推理期间实现高效重放。
请注意,使用包装器模块初始化需要一个热身阶段,在此阶段模块会执行多次。这个热身阶段确保内存分配和初始化不会被记录在 CUDA Graphs 中,这有助于保持一致的执行路径并优化性能。

class SampleModel(torch.nn.Module):
    def forward(self, x):
        return torch.relu((x + 2) * 0.5)


model = SampleModel().eval().cuda()
input = torch.randn((1, 3, 224, 224)).to("cuda")

# The 'torch_executed_ops' compiler option is used in this example to intentionally introduce graph breaks within the module.
# Note: The Dynamo backend is required for the CUDA Graph context manager to handle modules in an Ahead-Of-Time (AOT) manner.
opt_with_graph_break = torch_tensorrt.compile(
    model,
    ir="dynamo",
    inputs=[input],
    min_block_size=1,
    pass_through_build_failures=True,
    torch_executed_ops={"torch.ops.aten.mul.Tensor"},
)
如果模块存在 Graph Breaks,整个子模块都会被 CUDA Graphs 记录和重放
with torch_tensorrt.runtime.enable_cudagraphs(
    opt_with_graph_break
) as cudagraphs_module:
    cudagraphs_module(input)
脚本总运行时间: ( 0 分钟 0.000 秒)
