光流:使用 RAFT 模型预测运动
光流是预测两幅图像之间运动的任务,通常是视频的两个连续帧。光流模型以两幅图像作为输入,并预测光流:光流指示第一幅图像中每个像素的位移,并将它映射到第二幅图像中对应的像素。光流是 (2, H, W) 维张量,其中第一个轴对应于预测的水平和垂直位移。
以下示例说明了如何使用 torchvision 来使用我们对 RAFT 模型的实现来预测光流。我们还将看到如何将预测的光流转换为 RGB 图像以进行可视化。
import numpy as np
import torch
import matplotlib.pyplot as plt
import torchvision.transforms.functional as F


plt.rcParams["savefig.bbox"] = "tight"


def plot(imgs, **imshow_kwargs):
    if not isinstance(imgs[0], list):
        # Make a 2d grid even if there's just 1 row
        imgs = [imgs]

    num_rows = len(imgs)
    num_cols = len(imgs[0])
    _, axs = plt.subplots(nrows=num_rows, ncols=num_cols, squeeze=False)
    for row_idx, row in enumerate(imgs):
        for col_idx, img in enumerate(row):
            ax = axs[row_idx, col_idx]
            img = F.to_pil_image(img.to("cpu"))
            ax.imshow(np.asarray(img), **imshow_kwargs)
            ax.set(xticklabels=[], yticklabels=[], xticks=[], yticks=[])

    plt.tight_layout()
使用 Torchvision 读取视频
我们首先使用 read_video() 读取视频。或者,可以使用新的 VideoReader API(如果 torchvision 是从源代码构建的)。我们将在此处使用的视频来自 pexels.com,版权归 Pavel Danilyuk 所有,免费使用。
import tempfile
from pathlib import Path
from urllib.request import urlretrieve


video_url = "https://download.pytorch.org/tutorial/pexelscom_pavel_danilyuk_basketball_hd.mp4"
video_path = Path(tempfile.mkdtemp()) / "basketball.mp4"
_ = urlretrieve(video_url, video_path)
read_video() 返回视频帧、音频帧和与视频相关的元数据。在本例中,我们只需要视频帧。
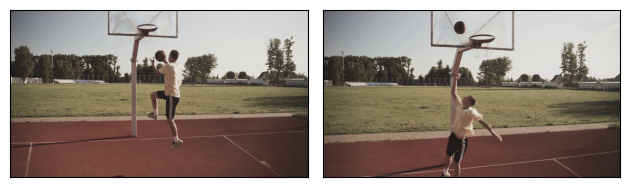
这里我们只会在 2 对预先选择的帧之间进行 2 次预测,即帧 (100, 101) 和 (150, 151)。这两对分别对应于一个模型输入。
from torchvision.io import read_video
frames, _, _ = read_video(str(video_path), output_format="TCHW")

img1_batch = torch.stack([frames[100], frames[150]])
img2_batch = torch.stack([frames[101], frames[151]])

plot(img1_batch)
/pytorch/vision/torchvision/io/video.py:161: UserWarning: The pts_unit 'pts' gives wrong results. Please use pts_unit 'sec'.
  warnings.warn("The pts_unit 'pts' gives wrong results. Please use pts_unit 'sec'.")
RAFT 模型接受 RGB 图像。我们首先从 read_video() 获取帧,并将它们调整大小以确保其尺寸可被 8 整除。注意,我们显式地使用 antialias=False,因为这些模型就是这样训练的。然后,我们使用捆绑在权重中的变换来预处理输入,并将它的值重新缩放到所需的 [-1, 1] 范围。
from torchvision.models.optical_flow import Raft_Large_Weights

weights = Raft_Large_Weights.DEFAULT
transforms = weights.transforms()


def preprocess(img1_batch, img2_batch):
    img1_batch = F.resize(img1_batch, size=[520, 960], antialias=False)
    img2_batch = F.resize(img2_batch, size=[520, 960], antialias=False)
    return transforms(img1_batch, img2_batch)


img1_batch, img2_batch = preprocess(img1_batch, img2_batch)

print(f"shape = {img1_batch.shape}, dtype = {img1_batch.dtype}")
shape = torch.Size([2, 3, 520, 960]), dtype = torch.float32
使用 RAFT 估计光流
我们将使用来自 raft_large() 的 RAFT 实现,它遵循与 原始论文 中描述的架构相同。我们还提供 raft_small() 模型构建器,它更小,运行速度更快,但精度略有下降。
from torchvision.models.optical_flow import raft_large

# If you can, run this example on a GPU, it will be a lot faster.
device = "cuda" if torch.cuda.is_available() else "cpu"

model = raft_large(weights=Raft_Large_Weights.DEFAULT, progress=False).to(device)
model = model.eval()

list_of_flows = model(img1_batch.to(device), img2_batch.to(device))
print(f"type = {type(list_of_flows)}")
print(f"length = {len(list_of_flows)} = number of iterations of the model")
Downloading: "https://download.pytorch.org/models/raft_large_C_T_SKHT_V2-ff5fadd5.pth" to /root/.cache/torch/hub/checkpoints/raft_large_C_T_SKHT_V2-ff5fadd5.pth
type = <class 'list'>
length = 12 = number of iterations of the model
RAFT 模型输出预测的光流列表,其中每个条目都是一个 (N, 2, H, W) 批次预测的光流,对应于模型中的给定“迭代”。有关模型迭代性质的更多详细信息,请参阅 原始论文。在这里,我们只对最终的预测光流感兴趣(它们是最准确的),所以我们将只检索列表中的最后一个项目。
如上所述,光流是一个维数为 (2, H, W) 的张量(或 (N, 2, H, W) 用于光流的批次),其中每个条目对应于从第一幅图像到第二幅图像的每个像素的水平和垂直位移。注意,预测的光流是以“像素”单位,它们没有针对图像的尺寸进行归一化。
predicted_flows = list_of_flows[-1]
print(f"dtype = {predicted_flows.dtype}")
print(f"shape = {predicted_flows.shape} = (N, 2, H, W)")
print(f"min = {predicted_flows.min()}, max = {predicted_flows.max()}")
dtype = torch.float32
shape = torch.Size([2, 2, 520, 960]) = (N, 2, H, W)
min = -3.8997151851654053, max = 6.400382995605469
可视化预测的光流
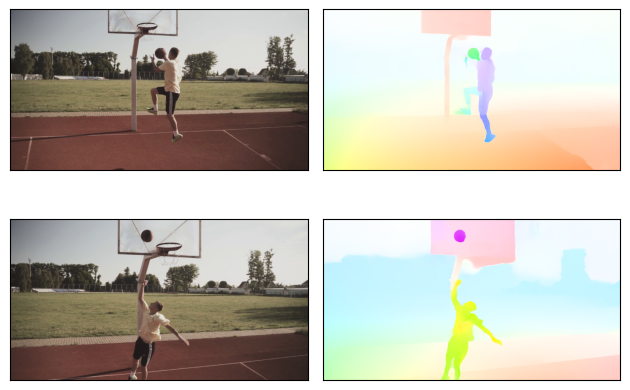
Torchvision 提供了 flow_to_image() 工具,用于将光流转换为 RGB 图像。它还支持光流的批次。光流中的每个“方向”都将映射到一个给定的 RGB 颜色。在下面的图像中,颜色相似的像素被模型认为是在相似的方向上移动。该模型能够正确地预测球和球员的运动。特别要注意球在第一幅图像(向左移动)和第二幅图像(向上移动)中的不同预测方向。
from torchvision.utils import flow_to_image

flow_imgs = flow_to_image(predicted_flows)

# The images have been mapped into [-1, 1] but for plotting we want them in [0, 1]
img1_batch = [(img1 + 1) / 2 for img1 in img1_batch]

grid = [[img1, flow_img] for (img1, flow_img) in zip(img1_batch, flow_imgs)]
plot(grid)
奖励:创建预测光流的 GIF
在上面的示例中,我们只展示了 2 对帧的预测光流。应用光流模型的一种有趣方式是在整个视频上运行模型,并使用所有预测的光流创建一个新视频。下面是一个可以帮助你开始的代码段。我们注释掉代码,因为此示例正在没有 GPU 的机器上渲染,并且运行它需要太长时间。
# from torchvision.io import write_jpeg
# for i, (img1, img2) in enumerate(zip(frames, frames[1:])):
#     # Note: it would be faster to predict batches of flows instead of individual flows
#     img1, img2 = preprocess(img1, img2)

#     list_of_flows = model(img1.to(device), img2.to(device))
#     predicted_flow = list_of_flows[-1][0]
#     flow_img = flow_to_image(predicted_flow).to("cpu")
#     output_folder = "/tmp/"  # Update this to the folder of your choice
#     write_jpeg(flow_img, output_folder + f"predicted_flow_{i}.jpg")
保存 .jpg 光流图像后,可以使用 ffmpeg 将它们转换为视频或 GIF,例如:
ffmpeg -f image2 -framerate 30 -i predicted_flow_%d.jpg -loop -1 flow.gif
脚本的总运行时间:(0 分 9.683 秒)
