TorchVision 推出了一款新的向后兼容 API,用于构建支持多权重的模型。新 API 允许在同一模型变体上加载不同的预训练权重,跟踪重要的元数据(如分类标签),并包含使用模型所需的预处理转换。在这篇博文中,我们计划回顾原型 API,展示其功能,并强调与现有 API 的主要区别。

我们希望在最终确定 API 之前听取您的想法。为了收集您的反馈,我们创建了一个 Github Issue,您可以在其中发布您的想法、问题和评论。
当前 API 的局限性
TorchVision 目前提供预训练模型,这些模型可以作为迁移学习的起点,或者直接用于计算机视觉应用。实例化预训练模型并进行预测的典型方法是
import torch

from PIL import Image
from torchvision import models as M
from torchvision.transforms import transforms as T


img = Image.open("test/assets/encode_jpeg/grace_hopper_517x606.jpg")

# Step 1: Initialize model
model = M.resnet50(pretrained=True)
model.eval()

# Step 2: Define and initialize the inference transforms
preprocess = T.Compose([
    T.Resize([256, ]),
    T.CenterCrop(224),
    T.PILToTensor(),
    T.ConvertImageDtype(torch.float),
    T.Normalize([0.485, 0.456, 0.406], [0.229, 0.224, 0.225])
])

# Step 3: Apply inference preprocessing transforms
batch = preprocess(img).unsqueeze(0)
prediction = model(batch).squeeze(0).softmax(0)

# Step 4: Use the model and print the predicted category
class_id = prediction.argmax().item()
score = prediction[class_id].item()
with open("imagenet_classes.txt", "r") as f:
    categories = [s.strip() for s in f.readlines()]
    category_name = categories[class_id]
print(f"{category_name}: {100 * score}%")
上述方法存在一些局限性
- 无法支持多个预训练权重:由于
pretrained变量是布尔值,我们只能提供一组权重。当我们显著 提高现有模型的准确性 并希望将这些改进提供给社区时,这带来了严重的局限性。它也阻止我们提供同一模型变体在不同数据集上的预训练权重。 - 缺少推理/预处理转换:用户在使用模型之前被迫定义必要的转换。推理转换通常与训练过程和用于估计权重的日期集相关联。这些转换中的任何微小差异(例如插值值、调整大小/裁剪大小等)都可能导致准确性大幅下降或模型无法使用。
- 缺少元数据:与权重相关的关键信息对用户不可用。例如,需要查阅外部来源和文档才能找到 类别标签、训练配方、准确性指标等。
新 API 解决了上述局限性,并减少了标准任务所需的样板代码。
原型 API 概述
让我们看看如何使用新 API 获得与上述完全相同的结果
from PIL import Image
from torchvision.prototype import models as PM


img = Image.open("test/assets/encode_jpeg/grace_hopper_517x606.jpg")

# Step 1: Initialize model
weights = PM.ResNet50_Weights.IMAGENET1K_V1
model = PM.resnet50(weights=weights)
model.eval()

# Step 2: Initialize the inference transforms
preprocess = weights.transforms()

# Step 3: Apply inference preprocessing transforms
batch = preprocess(img).unsqueeze(0)
prediction = model(batch).squeeze(0).softmax(0)

# Step 4: Use the model and print the predicted category
class_id = prediction.argmax().item()
score = prediction[class_id].item()
category_name = weights.meta["categories"][class_id]
print(f"{category_name}: {100 * score}*%*")
正如我们所看到的,新 API 消除了上述局限性。让我们详细探讨新功能。
多权重支持
新 API 的核心是能够为同一模型变体定义多个不同的权重。每个模型构建方法(例如 resnet50)都有一个相关的枚举类(例如 ResNet50_Weights),其中包含与可用预训练权重数量一样多的条目。此外,每个枚举类都有一个 DEFAULT 别名,指向特定模型可用的最佳权重。这使得希望始终使用最佳可用权重的用户无需修改代码即可实现。
这是一个使用不同权重初始化模型的示例
from torchvision.prototype.models import resnet50, ResNet50_Weights

# Legacy weights with accuracy 76.130%
model = resnet50(weights=ResNet50_Weights.IMAGENET1K_V1)

# New weights with accuracy 80.858%
model = resnet50(weights=ResNet50_Weights.IMAGENET1K_V2)

# Best available weights (currently alias for IMAGENET1K_V2)
model = resnet50(weights=ResNet50_Weights.DEFAULT)

# No weights - random initialization
model = resnet50(weights=None)
关联的元数据和预处理转换
每个模型的权重都与元数据相关联。我们存储的信息类型取决于模型的任务(分类、检测、分割等)。典型信息包括训练配方的链接、插值模式、类别和验证指标等信息。这些值可以通过 meta 属性以编程方式访问
from torchvision.prototype.models import ResNet50_Weights

# Accessing a single record
size = ResNet50_Weights.IMAGENET1K_V2.meta["size"]

# Iterating the items of the meta-data dictionary
for k, v in ResNet50_Weights.IMAGENET1K_V2.meta.items():
    print(k, v)
此外,每个权重条目都与必要的预处理转换相关联。所有当前的预处理转换都是 JIT 可脚本化的,可以通过 transforms 属性访问。在使用它们处理数据之前,需要初始化/构造转换。这种惰性初始化方案旨在确保解决方案的内存效率。转换的输入可以是 PIL.Image,也可以是使用 torchvision.io 读取的 Tensor。
from torchvision.prototype.models import ResNet50_Weights

# Initializing preprocessing at standard 224x224 resolution
preprocess = ResNet50_Weights.IMAGENET1K_V2.transforms()

# Initializing preprocessing at 400x400 resolution
preprocess = ResNet50_Weights.IMAGENET1K_V2.transforms(crop_size=400, resize_size=400)

# Once initialized the callable can accept the image data:
# img_preprocessed = preprocess(img)
将权重与其元数据和预处理相关联将提高透明度,改善可复现性,并使其更容易记录一组权重是如何生成的。
按名称获取权重
能够直接将权重与其属性(元数据、预处理可调用对象等)关联起来是我们的实现使用枚举而不是字符串的原因。然而,对于仅知道权重名称的情况,我们提供了一种能够将权重名称链接到其枚举的方法
from torchvision.prototype.models import get_weight

# Weights can be retrieved by name:
assert get_weight("ResNet50_Weights.IMAGENET1K_V1") == ResNet50_Weights.IMAGENET1K_V1
assert get_weight("ResNet50_Weights.IMAGENET1K_V2") == ResNet50_Weights.IMAGENET1K_V2

# Including using the DEFAULT alias:
assert get_weight("ResNet50_Weights.DEFAULT") == ResNet50_Weights.IMAGENET1K_V2
弃用
在新 API 中,以前用于将权重加载到完整模型或其骨干的布尔参数 pretrained 和 pretrained_backbone 已被弃用。当前的实现完全向后兼容,因为它无缝地将旧参数映射到新参数。在新的构建器中使用旧参数会发出以下弃用警告
>>> model = torchvision.prototype.models.resnet50(pretrained=True)
 UserWarning: The parameter 'pretrained' is deprecated, please use 'weights' instead.
UserWarning:
Arguments other than a weight enum or `None` for 'weights' are deprecated.
The current behavior is equivalent to passing `weights=ResNet50_Weights.IMAGENET1K_V1`.
You can also use `weights=ResNet50_Weights.DEFAULT` to get the most up-to-date weights.
此外,构建器方法要求使用关键字参数。位置参数的使用已被弃用,使用它们会发出以下警告
>>> model = torchvision.prototype.models.resnet50(None)
UserWarning:
Using 'weights' as positional parameter(s) is deprecated.
Please use keyword parameter(s) instead.
测试新 API
迁移到新 API 非常简单。以下两种 API 之间的方法调用是等效的
# Using pretrained weights:
torchvision.prototype.models.resnet50(weights=ResNet50_Weights.IMAGENET1K_V1)
torchvision.models.resnet50(pretrained=True)
torchvision.models.resnet50(True)

# Using no weights:
torchvision.prototype.models.resnet50(weights=None)
torchvision.models.resnet50(pretrained=False)
torchvision.models.resnet50(False)
请注意,原型功能仅在 TorchVision 的夜间版本中可用,因此要使用它,您需要按如下方式安装它
conda install torchvision -c pytorch-nightly
有关安装夜间版本的替代方法,请参阅 PyTorch 下载页面。您还可以从最新的主版本源码安装 TorchVision;有关更多信息,请参阅我们的 仓库。
使用新 API 访问最先进的模型权重
如果您仍然不相信尝试新的 API,这里有另一个理由。我们最近刷新了 训练配方,并从我们的许多模型中获得了 SOTA 准确性。改进的权重可以通过新 API 轻松访问。以下是模型改进的快速概述
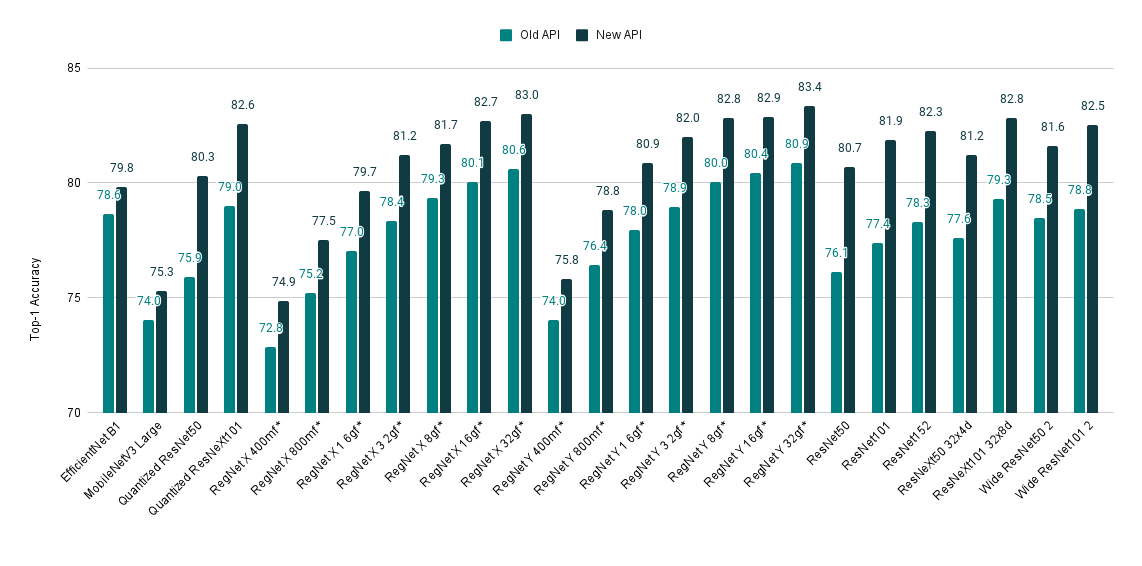
| 模型 | 旧 Acc@1 | 新 Acc@1 |
|---|---|---|
| EfficientNet B1 | 78.642 | 79.838 |
| MobileNetV3 Large | 74.042 | 75.274 |
| 量化 ResNet50 | 75.92 | 80.282 |
| 量化 ResNeXt101 32x8d | 78.986 | 82.574 |
| RegNet X 400mf | 72.834 | 74.864 |
| RegNet X 800mf | 75.212 | 77.522 |
| RegNet X 1 6gf | 77.04 | 79.668 |
| RegNet X 3 2gf | 78.364 | 81.198 |
| RegNet X 8gf | 79.344 | 81.682 |
| RegNet X 16gf | 80.058 | 82.72 |
| RegNet X 32gf | 80.622 | 83.018 |
| RegNet Y 400mf | 74.046 | 75.806 |
| RegNet Y 800mf | 76.42 | 78.838 |
| RegNet Y 1 6gf | 77.95 | 80.882 |
| RegNet Y 3 2gf | 78.948 | 81.984 |
| RegNet Y 8gf | 80.032 | 82.828 |
| RegNet Y 16gf | 80.424 | 82.89 |
| RegNet Y 32gf | 80.878 | 83.366 |
| ResNet50 | 76.13 | 80.858 |
| ResNet101 | 77.374 | 81.886 |
| ResNet152 | 78.312 | 82.284 |
| ResNeXt50 32x4d | 77.618 | 81.198 |
| ResNeXt101 32x8d | 79.312 | 82.834 |
| Wide ResNet50 2 | 78.468 | 81.602 |
| Wide ResNet101 2 | 78.848 | 82.51 |
请花几分钟时间提供您对新 API 的反馈,这对将其从原型阶段提升并在下个版本中包含至关重要。您可以在专门的 Github Issue 上进行此操作。我们期待您的评论!